Okay, let’s be honest, who among us hasn’t dreamt of a dessert that’s both sophisticated and utterly comforting? Something that whispers “I have my life together” while simultaneously screaming “treat yourself!” Well, my friends, your dreams are about to come true. Today, we’re diving headfirst into the wonderfully delicious world of cheesecake, but not just any cheesecake. We’re talking about a Chocolate Swirl Cheesecake: Indulge in a Decadent Dessert Twist, a dessert so rich and decadent, it’s practically a hug in every bite. I remember the first time I made this; my husband, usually a stoic, reserved man, actually *moaned* with pleasure. That’s when I knew I had a winner. This recipe isn’t just about baking; it’s about creating an experience, a moment of pure bliss in our often-chaotic lives. It may seem intimidating, but trust me, with my guidance, you’ll be whipping up this masterpiece in no time. So, grab your apron, preheat your oven, and let’s embark on this sweet adventure together!
Whether you’re planning a special occasion or simply craving a little something sweet, this Chocolate Swirl Cheesecake is guaranteed to impress. Get ready for a dessert that’s as visually stunning as it is delicious. I’ll guide you through each step, ensuring your cheesecake turns out perfectly creamy, smooth, and irresistibly chocolatey. Let’s get baking! Looking for another easy and heavenly treat? You might also enjoy our Delectable Chocolate-Dipped Banana Bites: Easy & Heavenly Treat!
The Allure of Chocolate Swirl Cheesecake
Why a chocolate swirl cheesecake, you might ask? Well, besides the obvious (chocolate!), it’s a dessert that offers the best of both worlds. You get the classic, creamy tang of a traditional cheesecake, beautifully balanced with the rich, intense flavor of chocolate. It’s a symphony of textures and tastes, a dance of sweet and tangy that will leave your taste buds singing. Moreover, the swirling effect adds a touch of elegance and artistry, making it a showstopper for any gathering. It’s not just a dessert; it’s a statement.
Why This Recipe Works
This recipe is designed to be approachable, even for novice bakers. It breaks down the process into manageable steps, offering clear instructions and helpful tips along the way. We’ll focus on using high-quality ingredients and proper techniques to achieve a perfectly smooth and creamy texture, avoiding common pitfalls like cracking or sinking. Also, I’ve tested this recipe countless times, tweaking and perfecting it until it’s foolproof. So, rest assured, you’re in good hands!
A Little History (and a Personal Touch)
Cheesecake, in its various forms, has been around for centuries. The ancient Greeks even served a type of cheesecake to athletes during the Olympic Games! The modern cheesecake we know and love, however, originated in America. The addition of chocolate, of course, is a more recent innovation, but one that has quickly become a beloved classic. I remember my grandmother making a simple vanilla cheesecake every Thanksgiving. It was always the highlight of the meal. This chocolate swirl version is my way of honoring her tradition while adding my own twist. She would have loved it, I think. I hope you will too.
Ingredients for Your Decadent Delight
For the Crust:
- 1 1/2 cups (about 150g) graham cracker crumbs
- 5 tablespoons (70g) unsalted butter, melted
- 1/4 cup (50g) granulated sugar
For the Cheesecake Filling:
- 32 ounces (900g) cream cheese, softened to room temperature
- 1 1/2 cups (300g) granulated sugar
- 1/4 cup (30g) all-purpose flour
- 1 teaspoon vanilla extract
- 1/4 teaspoon salt
- 4 large eggs, room temperature
- 1/2 cup (120ml) heavy cream
For the Chocolate Swirl:
- 4 ounces (115g) semi-sweet chocolate, melted and slightly cooled
- 2 tablespoons heavy cream
Step-by-Step Instructions: Baking Your Masterpiece
Part 1: Preparing the Crust
- Preheat and Prep: Preheat your oven to 350°F (175°C). Grease a 9-inch springform pan and wrap the bottom tightly with aluminum foil (to prevent leaks during the water bath). I use heavy-duty foil and wrap it twice, just to be extra safe.
- Combine Ingredients: In a medium bowl, combine the graham cracker crumbs, melted butter, and sugar. Mix well until evenly moistened.
- Press into Pan: Press the mixture firmly into the bottom of the prepared springform pan, creating an even layer. You can use the bottom of a measuring cup to help press it down smoothly.
- Bake: Bake the crust for 8-10 minutes, or until lightly golden brown. Let it cool completely while you prepare the filling.
Part 2: Crafting the Cheesecake Filling
- Cream Cheese Magic: In a large bowl (or the bowl of your stand mixer), beat the softened cream cheese with an electric mixer on medium speed until smooth and creamy. This is crucial! Lumpy cream cheese will ruin the texture of your cheesecake.
- Sugar and Flour: Gradually add the sugar and flour to the cream cheese, mixing on low speed until just combined. Be careful not to overmix, as this can incorporate too much air and cause the cheesecake to crack.
- Flavor Boost: Add the vanilla extract and salt, and mix until combined.
- Eggs One at a Time: Add the eggs one at a time, mixing on low speed after each addition until just combined. Again, avoid overmixing.
- Creamy Finish: Stir in the heavy cream until the filling is smooth and creamy.
Part 3: Creating the Chocolate Swirl
- Melt the Chocolate: In a heatproof bowl set over a saucepan of simmering water (or in the microwave in 30-second intervals), melt the semi-sweet chocolate until smooth. Stir in the heavy cream.
- Divide the Filling: Pour about 1 1/2 cups of the cheesecake filling into a separate bowl. Add the melted chocolate mixture and stir until well combined.
- Swirl Time: Pour half of the plain cheesecake filling over the cooled crust. Then, dollop spoonfuls of the chocolate cheesecake filling over the plain filling. Repeat with the remaining plain and chocolate fillings.
- Swirl Away: Use a knife or skewer to gently swirl the chocolate filling into the plain filling, creating a marbled effect. Be careful not to over-swirl, as this can muddy the colors.
Part 4: Baking to Perfection
- Water Bath Preparation: Place the springform pan inside a larger roasting pan. Carefully pour hot water into the roasting pan until it reaches about halfway up the sides of the springform pan. This water bath will help to ensure even baking and prevent cracking.
- Bake: Bake in the preheated oven for 55-70 minutes, or until the edges are set but the center still jiggles slightly. The internal temperature should reach about 150°F (65°C).
- Cooling Process: Turn off the oven and crack the oven door slightly. Let the cheesecake cool in the oven for 1 hour. This gradual cooling process helps to prevent cracking.
- Chill: Remove the cheesecake from the water bath and let it cool completely at room temperature. Then, cover it with plastic wrap and refrigerate for at least 6 hours, or preferably overnight. This is crucial for allowing the cheesecake to fully set and develop its flavor.
Part 5: Serving and Enjoying
- Release and Serve: Before serving, run a thin knife around the edge of the cheesecake to loosen it from the pan. Release the springform pan and carefully transfer the cheesecake to a serving plate.
- Garnish (Optional): Garnish with fresh berries, chocolate shavings, or a dusting of cocoa powder, if desired.
- Enjoy: Slice and serve! This cheesecake is best enjoyed chilled.
Tips and Tricks for Cheesecake Success
- Room Temperature is Key: Make sure your cream cheese and eggs are at room temperature. This will help them blend together smoothly and prevent lumps in the filling.
- Don’t Overmix: Overmixing the filling can incorporate too much air, causing the cheesecake to puff up and then crack during baking. Mix on low speed and only until just combined.
- Water Bath is Your Friend: The water bath is essential for creating a moist and even baking environment, which helps to prevent cracking.
- Patience is a Virtue: Don’t rush the cooling process. Letting the cheesecake cool gradually in the oven and then chilling it in the refrigerator is crucial for achieving the perfect texture.
- Experiment with Chocolate: Feel free to experiment with different types of chocolate for the swirl. Dark chocolate, milk chocolate, or even white chocolate would all be delicious.
- Crust Variations: You can also experiment with different crusts. Try using Oreo cookies, chocolate graham crackers, or even a shortbread crust. If you’re feeling adventurous, you could try a savory crust, similar to what we use in our Cheesesteak Stuffed Garlic Bread: An Indulgent Cheesy Recipe for an unexpected twist!
Troubleshooting Common Cheesecake Problems
Why did my cheesecake crack?
Cracking is a common problem with cheesecakes. It’s usually caused by baking the cheesecake at too high a temperature, overbaking it, or cooling it too quickly. Using a water bath and cooling the cheesecake gradually in the oven can help to prevent cracking.
Why is my cheesecake sinking in the middle?
Sinking is often caused by overmixing the filling or not baking the cheesecake long enough. Be sure to mix the filling on low speed and only until just combined. Also, make sure the edges of the cheesecake are set before removing it from the oven.
Why is my cheesecake lumpy?
Lumpy cheesecake is usually caused by using cold cream cheese. Make sure your cream cheese is softened to room temperature before mixing it into the filling.
My crust is soggy. What did I do wrong?
A soggy crust can happen if the butter isn’t evenly distributed through the graham cracker crumbs, or if the crust wasn’t baked long enough before the filling was added. Make sure the butter is fully incorporated and bake the crust until it’s lightly golden brown.
FAQ: Your Cheesecake Questions Answered
- Can I make this cheesecake ahead of time?
- Absolutely! In fact, it’s best to make this cheesecake a day or two in advance to allow the flavors to fully develop. Just be sure to store it covered in the refrigerator.
- Can I freeze this cheesecake?
- Yes, you can freeze this cheesecake. Wrap it tightly in plastic wrap and then in aluminum foil. It can be stored in the freezer for up to 2 months. Thaw it in the refrigerator overnight before serving.
- Can I use a different size springform pan?
- While a 9-inch springform pan is ideal, you can use an 8-inch pan. However, you may need to adjust the baking time slightly. Keep an eye on it and check for doneness using the guidelines in the recipe.
- I don’t have a springform pan. Can I use something else?
- A springform pan is really the best option for cheesecake, as it allows you to easily remove the cheesecake without damaging it. However, if you don’t have one, you can try using a regular cake pan lined with parchment paper, leaving an overhang to lift the cheesecake out. Be extra careful when removing it.
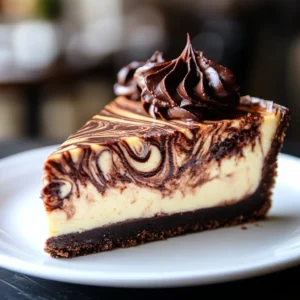
Chocolate Swirl Cheesecake: Indulge in a Decadent Dessert Twist
Equipment
- 9-inch springform pan
- Mixing Bowls
- Electric mixer or stand mixer
- Measuring cups and spoons
- Aluminum foil
- roasting pan
- knife or skewer (for swirling)
Ingredients
- 1½ cups graham cracker crumbs (150g)
- 5 tbsp unsalted butter, melted (70g)
- ¼ cup granulated sugar (50g)
- 32 oz cream cheese, softened (900g)
- 1½ cups granulated sugar (300g)
- ¼ cup all-purpose flour (30g)
- 1 tsp vanilla extract
- ¼ tsp salt
- 4 large eggs, room temperature
- ½ cup heavy cream (120ml)
- 4 oz semi-sweet chocolate, melted (115g)
- 2 tbsp heavy cream (for chocolate swirl)
Instructions
- Preheat oven to 350°F (175°C). Grease a 9-inch springform pan and wrap the bottom with foil.
- Mix graham cracker crumbs, melted butter, and sugar. Press into the pan base evenly and bake 8–10 minutes. Let cool.
- Beat cream cheese until smooth. Add sugar and flour gradually, mixing on low. Stir in vanilla and salt.
- Add eggs one at a time, mixing just until combined. Stir in heavy cream until smooth.
- Melt chocolate and stir in cream. Mix 1½ cups of the plain filling with chocolate to create swirl batter.
- Layer half plain filling in crust. Dollop with some chocolate mix. Repeat layers, then swirl with knife or skewer.
- Place pan in larger roasting dish. Add hot water halfway up sides for water bath. Bake 55–70 mins until set edges and jiggly center.
- Turn off oven and let cheesecake cool inside for 1 hour. Then cool completely at room temp.
- Cover and chill at least 6 hours or overnight for best results.
- Before serving, release springform, garnish as desired, and slice to serve.


