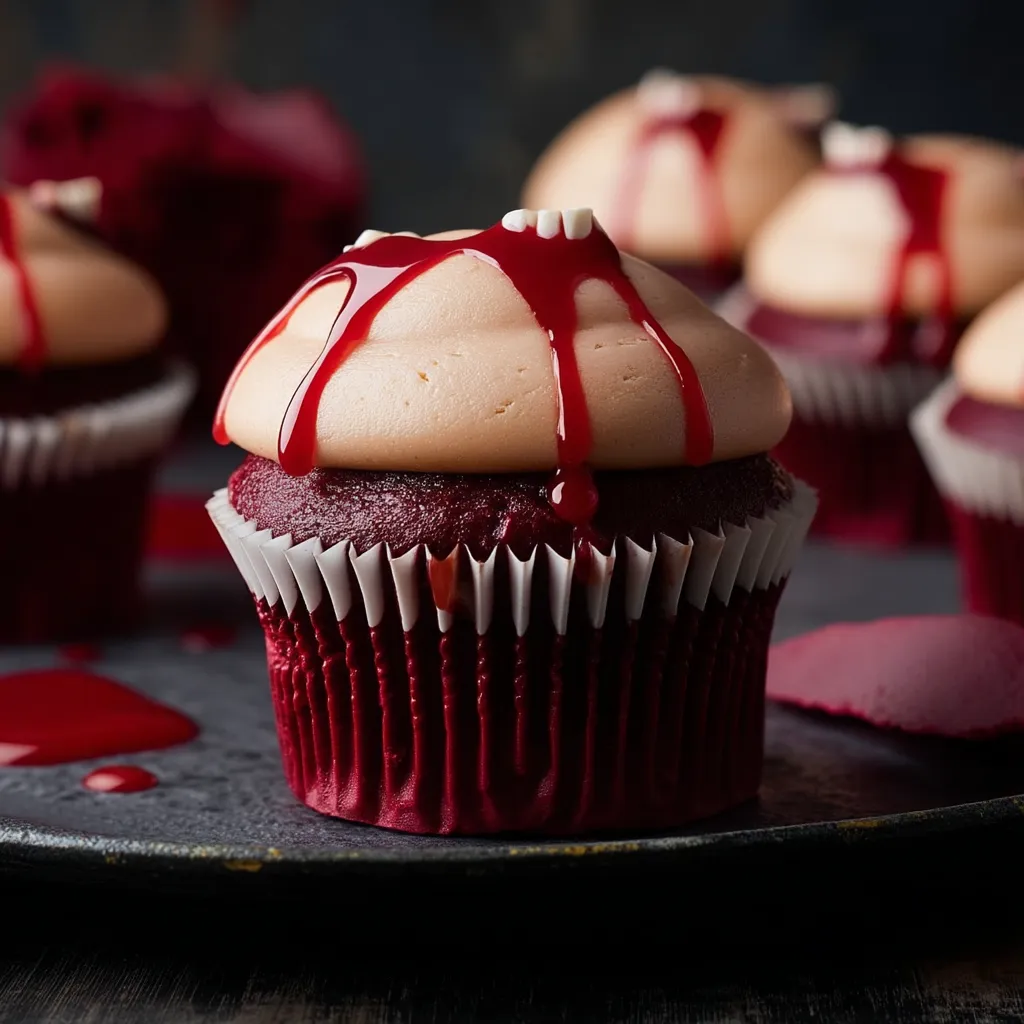
I’ll never forget the Halloween party where I brought a batch of cupcakes that looked like they’d been attacked by tiny vampires – the kids went absolutely wild! The vibrant red “blood” dripping down the sides, the realistic-looking bite marks… it was a spooky sensation. That’s when I knew I had to share this recipe. Today, I’m thrilled to show you how to create the most deliciously terrifying Vampire Bite Halloween Cupcakes that will be the hit of any spooky celebration!
Creating the Perfect Vampire Bite Halloween Cupcakes
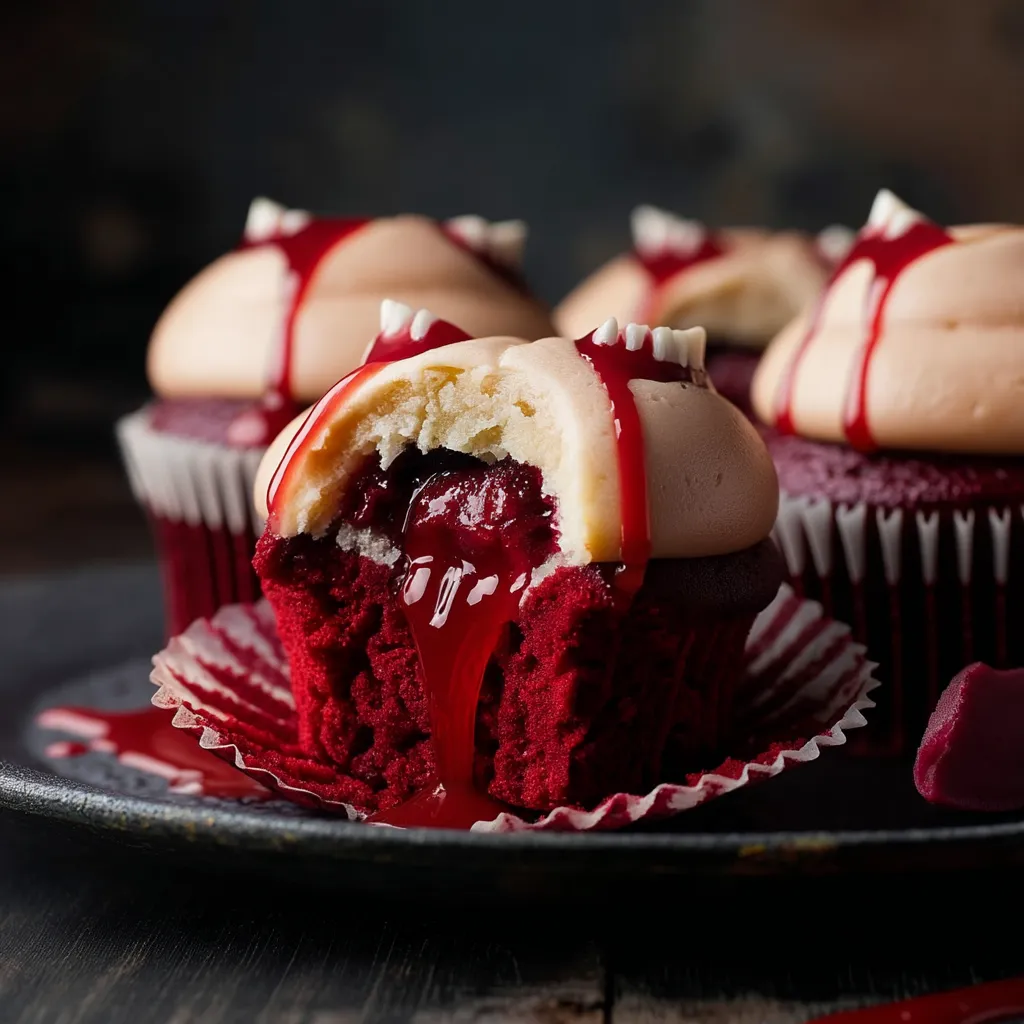
Halloween is just around the corner, and what better way to celebrate than with some wickedly delicious treats? These Vampire Bite Halloween Cupcakes are not only spooky and fun, but they’re also surprisingly easy to make. The key is in the details – the moist cupcake, the creamy frosting, and, of course, the realistic vampire bite marks filled with a blood-red “bite.” Get ready to sink your teeth into this hauntingly good recipe!
What Makes These Cupcakes Special?
These aren’t just any cupcakes; they’re an experience! The combination of the rich chocolate flavor with the sweet, tangy “blood” filling is simply irresistible. Plus, the visual impact of the vampire bites makes them a total showstopper. Imagine the delight on your guests’ faces when they see these creepy-cute cupcakes. Let’s get started!
Ingredients You’ll Need
Before we dive into the recipe, let’s gather our ingredients. Don’t worry, most of them are pantry staples, and the rest are easily found at your local grocery store.
For the Chocolate Cupcakes:
- 1 ½ cups all-purpose flour
- ¾ cup unsweetened cocoa powder
- 1 ½ teaspoons baking powder
- 1 ½ teaspoons baking soda
- ¾ teaspoon salt
- 1 ½ cups granulated sugar
- ¾ cup vegetable oil
- 1 ½ teaspoons vanilla extract
- 1 ½ cups buttermilk (or milk with 1 ½ tablespoons of vinegar or lemon juice)
- ¾ cup boiling water
For the Vanilla Buttercream Frosting:
- 1 cup (2 sticks) unsalted butter, softened
- 3-4 cups powdered sugar
- ¼ cup milk or heavy cream
- 1 teaspoon vanilla extract
- Pinch of salt
For the “Blood” Filling:
- 1 cup seedless raspberry jam (or cherry preserves)
- 1-2 tablespoons corn syrup (for shine and texture)
- Red food coloring (gel is best for a vibrant color)
Step-by-Step Instructions: Baking the Cupcakes
Now, let’s get baking! Follow these simple steps, and you’ll have perfectly moist and delicious chocolate cupcakes in no time.
- Preheat your oven to 350°F (175°C). Line a 12-cup muffin tin with cupcake liners. This will prevent sticking and make cleanup a breeze.
- Whisk together the dry ingredients. In a large bowl, whisk together the flour, cocoa powder, baking powder, baking soda, and salt. This ensures everything is evenly distributed for the best rise and flavor.
- Combine the wet ingredients. In a separate bowl, whisk together the sugar, oil, vanilla extract, and buttermilk. Make sure everything is well combined.
- Gradually add the wet ingredients to the dry ingredients. Mix on low speed until just combined. Be careful not to overmix! Overmixing can lead to tough cupcakes.
- Stir in the boiling water. This will thin the batter slightly and help to bloom the cocoa powder, intensifying the chocolate flavor. The batter will be thin – don’t worry, that’s normal!
- Fill the cupcake liners. Fill each liner about two-thirds full. This gives the cupcakes room to rise without overflowing.
- Bake for 18-20 minutes. Or until a toothpick inserted into the center comes out clean. Keep a close eye on them to avoid overbaking. Nobody likes a dry cupcake!
- Let the cupcakes cool in the tin for a few minutes. Then, transfer them to a wire rack to cool completely before frosting. This is crucial to prevent the frosting from melting.
Step-by-Step Instructions: Making the Vanilla Buttercream Frosting
Next up, the creamy, dreamy vanilla buttercream frosting. This frosting is the perfect complement to the rich chocolate cupcakes.
- Beat the butter. In a large bowl, beat the softened butter with an electric mixer until light and fluffy, about 2-3 minutes. This creates a smooth and airy base for the frosting.
- Gradually add the powdered sugar. Add the powdered sugar one cup at a time, beating on low speed until combined. This prevents a sugar cloud from exploding in your kitchen!
- Add the milk and vanilla extract. Mix until smooth and creamy. If the frosting is too thick, add a little more milk. If it’s too thin, add a little more powdered sugar.
- Whip the frosting. Beat on high speed for 1-2 minutes until light and airy. This step is important for creating a beautiful, spreadable frosting.
Step-by-Step Instructions: Creating the “Blood” Filling
Now for the fun part – making the “blood” filling! This is what gives the cupcakes their spooky vampire bite effect.
- Combine the raspberry jam and corn syrup. In a small saucepan, combine the raspberry jam and corn syrup. The corn syrup adds shine and a slightly thicker consistency.
- Heat over low heat. Stir constantly until the jam is melted and smooth. Be careful not to burn the jam!
- Add red food coloring. Stir in a few drops of red food coloring until you achieve your desired shade of “blood” red. Remember, you can always add more, but you can’t take it away!
- Let the mixture cool slightly. This will prevent it from being too runny when you fill the cupcakes.
Assembling the Vampire Bite Halloween Cupcakes
Here’s where the magic happens! Get ready to transform your ordinary cupcakes into spooky masterpieces.
- Frost the cupcakes. Use a piping bag or a knife to frost the cupcakes with the vanilla buttercream frosting. You can create a swirl, a smooth surface, or any design you like.
- Create the vampire bites. Use a small, sharp knife or a cupcake corer to carefully remove a small circle from the top of each cupcake. Don’t go too deep!
- Fill the holes with “blood.” Spoon the cooled raspberry jam mixture into the holes you created. Let the “blood” drip down the sides for a more dramatic effect.
- Serve and enjoy! These cupcakes are best enjoyed fresh, but they can be stored in an airtight container in the refrigerator for up to 3 days.
Success Tips for Vampire Bite Halloween Cupcakes
Want to ensure your Vampire Bite Halloween Cupcakes are a smashing success? Here are some golden tips to help you achieve cupcake perfection:
- Use room temperature ingredients. This is especially important for the butter and buttermilk. Room temperature ingredients combine more easily and create a smoother batter.
- Don’t overmix the batter. Overmixing develops the gluten in the flour, resulting in tough cupcakes. Mix until just combined.
- Use gel food coloring. Gel food coloring is more concentrated than liquid food coloring, so it will give you a more vibrant and true color without adding too much liquid to the “blood” filling.
- Let the cupcakes cool completely before frosting. This is essential to prevent the frosting from melting and sliding off.
- Make the “blood” filling ahead of time. This allows it to cool and thicken, making it easier to fill the cupcakes.
Variations and Adaptations
Want to put your own spin on these Vampire Bite Halloween Cupcakes? Here are a few ideas to get you started:
- Different Flavors: Experiment with different cupcake flavors, such as red velvet, vanilla, or even Pumpkin Spice Latte Cupcakes for a fall twist.
- Frosting Variations: Try a chocolate buttercream frosting, a cream cheese frosting, or even a simple glaze.
- “Blood” Filling Alternatives: If you’re not a fan of raspberry jam, try cherry preserves, strawberry jam, or even a homemade berry sauce.
- Spooky Decorations: Add edible glitter, candy eyeballs, or vampire fangs to the cupcakes for an extra touch of spookiness.
Serving Suggestions
These Vampire Bite Halloween Cupcakes are perfect for any Halloween celebration, from costume parties to school events. Here are a few serving suggestions to make them even more special:
- Presentation: Arrange the cupcakes on a spooky platter or cake stand. Add some cobwebs, plastic spiders, or other Halloween decorations for a festive touch.
- Pairings: Serve the cupcakes with a glass of milk, a cup of hot chocolate, or a spooky Halloween cocktail.
- Party Favors: Wrap individual cupcakes in cellophane bags and tie them with ribbon for a fun and easy party favor.
Other Halloween Treats to Try
If you’re looking for more Halloween-themed treats to make, here are a few of my other favorite recipes:
- Ghostly Meringues: These light and airy meringues are shaped like ghosts and are perfect for a spooky dessert.
- Witches’ Finger Cookies: These almond-flavored cookies are shaped like witches’ fingers and are decorated with a green “nail.”
- Monster Eye Cake Pops: These cake pops are decorated with candy eyeballs and colorful frosting to look like scary monsters.
Why These Cupcakes are a Must-Try
These Vampire Bite Halloween Cupcakes are more than just a dessert; they’re a conversation starter, a crowd-pleaser, and a guaranteed hit at any Halloween gathering. The combination of the delicious flavors, the spooky appearance, and the easy-to-follow recipe makes them a must-try for anyone who loves to bake and celebrate Halloween.
And if you are looking for other fun things to bake, might I suggest FIREWORKS OREO CHEESECAKE BARS for a festive celebration? Or maybe S’MORES BAR BLISS for a campfire-inspired treat? You could also whip up a batch of PUMPKIN CREAM CHEESE BARS for a taste of fall, or indulge in the decadent S’MORES CHEESECAKE. These recipes are just a few examples of the many delicious treats you can create in your own kitchen.
A Final Word of Encouragement
Baking is a journey, not a destination. Don’t be afraid to experiment, to make mistakes, and to have fun along the way. The most important ingredient in any recipe is love, so pour your heart into these Vampire Bite Halloween Cupcakes, and I promise they will be a hauntingly delicious success!
Happy baking, and Happy Halloween!
What makes these Vampire Bite Halloween Cupcakes special?
These cupcakes are special because they combine rich chocolate flavor with a sweet and tangy “blood” filling and have a visually striking vampire bite design, making them both delicious and a showstopper.
What’s the key ingredient for achieving a vibrant red color in the ‘blood’ filling?
Using gel food coloring is key for achieving a vibrant, true red color in the “blood” filling without adding too much liquid.
Can I make the “blood” filling ahead of time?
Yes, making the “blood” filling ahead of time is recommended as it allows it to cool and thicken, making it easier to fill the cupcakes.
What are some variations I can try with this recipe?
You can experiment with different cupcake flavors like red velvet or pumpkin spice, try different frostings like chocolate buttercream or cream cheese, use alternative “blood” fillings like cherry or strawberry jam, or add spooky decorations like edible glitter or candy eyeballs.
Vampire Bite Halloween Cupcakes
Equipment
- 12-cup muffin tin
- Cupcake liners
- Large mixing bowls
- Whisk
- Electric mixer
- Small saucepan
- Spoon
- Small, sharp knife or cupcake corer
- Piping bag (optional)
- Wire rack
- Measuring cups and spoons
- Toothpick
Ingredients
- 1 ½ cups all-purpose flour
- ¾ cup unsweetened cocoa powder
- 1 ½ teaspoons baking powder
- 1 ½ teaspoons baking soda
- ¾ teaspoon salt
- 1 ½ cups granulated sugar
- ¾ cup vegetable oil
- 1 ½ teaspoons vanilla extract
- 1 ½ cups buttermilk or milk with 1 ½ tablespoons of vinegar or lemon juice
- ¾ cup boiling water
- 3-4 cups powdered sugar
- ¼ cup milk or heavy cream
- 1 teaspoon vanilla extract
- Pinch of salt
- 1 cup seedless raspberry jam or cherry preserves
- 1-2 tablespoons corn syrup
- Red food coloring gel is best for a vibrant color
Instructions
- Preheat your oven to 350°F (175°C). Line a 12-cup muffin tin with cupcake liners.
- In a large bowl, whisk together the flour, cocoa powder, baking powder, baking soda, and salt.
- In a separate bowl, whisk together the sugar, oil, vanilla extract, and buttermilk.
- Gradually add the wet ingredients to the dry ingredients. Mix on low speed until just combined. Be careful not to overmix!
- Stir in the boiling water. The batter will be thin – don’t worry, that’s normal!
- Fill each cupcake liner about two-thirds full.
- Bake for 18-20 minutes. Or until a toothpick inserted into the center comes out clean.
- Let the cupcakes cool in the tin for a few minutes. Then, transfer them to a wire rack to cool completely before frosting.
- In a large bowl, beat the softened butter with an electric mixer until light and fluffy, about 2-3 minutes.
- Gradually add the powdered sugar one cup at a time, beating on low speed until combined.
- Add the milk and vanilla extract. Mix until smooth and creamy. If the frosting is too thick, add a little more milk. If it’s too thin, add a little more powdered sugar.
- Beat on high speed for 1-2 minutes until light and airy.
- In a small saucepan, combine the raspberry jam and corn syrup.
- Heat over low heat. Stir constantly until the jam is melted and smooth. Be careful not to burn the jam!
- Stir in a few drops of red food coloring until you achieve your desired shade of ‘blood’ red.
- Let the mixture cool slightly.
- Frost the cupcakes. Use a piping bag or a knife to frost the cupcakes with the vanilla buttercream frosting.
- Use a small, sharp knife or a cupcake corer to carefully remove a small circle from the top of each cupcake. Don’t go too deep!
- Spoon the cooled raspberry jam mixture into the holes you created. Let the ‘blood’ drip down the sides for a more dramatic effect.
- Serve and enjoy! These cupcakes are best enjoyed fresh, but they can be stored in an airtight container in the refrigerator for up to 3 days.
