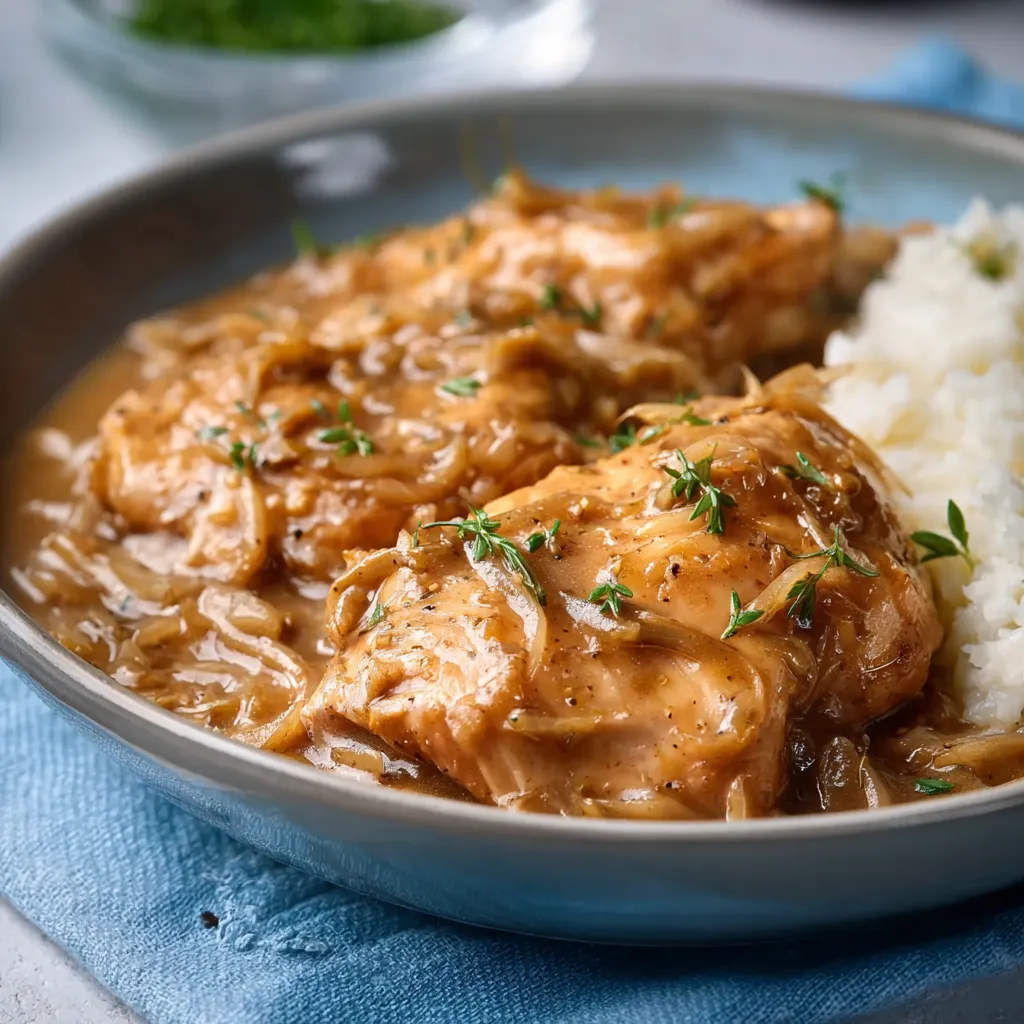
I can still picture my Grandma Rose, standing at her well-worn stovetop, the savory aroma of herbs and chicken filling her cozy kitchen. She always made the most comforting meals, and her secret, I believe, was love. One of my fondest memories is of her simple, yet incredibly delicious, Chicken and Gravy Stovetop, served over mashed potatoes. Today, I’m going to show you how to create that same magic in your own kitchen – get ready for a truly heartwarming meal!
The Magic of Stovetop Chicken and Gravy

Chicken and gravy – it’s a classic comfort food for a reason! But often, making it can seem intimidating. Maybe you’ve had gravy that’s too thin, or chicken that’s dry. Maybe you’ve just never tried it before! Fear not, my friend! This recipe is designed to be foolproof and utterly delicious, even if you’re a beginner cook. We’re going to break down each step, focusing on techniques that guarantee success. Get ready to create a dish that will have everyone asking for seconds – and the recipe!
Why Stovetop is the Way to Go
While oven-baked chicken is fantastic, there’s something special about cooking chicken and gravy right on the stovetop. It’s faster, more hands-on, and allows for incredible flavor development. You have complete control over the heat, ensuring perfectly cooked chicken and a luscious, velvety gravy. Plus, cleanup is a breeze! Seriously, what’s not to love?
Ingredients: Your Shopping List to Success
Before we dive into the cooking process, let’s gather our ingredients. High-quality ingredients make a HUGE difference in the final flavor, so choose wisely when you can. This isn’t about being fancy; it’s about selecting fresh, flavorful components.
- Chicken: About 2 pounds of boneless, skinless chicken breasts or thighs (or a mix!). I personally love using a combination for the best flavor and texture. If using breasts, consider pounding them to an even thickness for faster, more even cooking.
- All-Purpose Flour: This is the key to a beautiful, thick gravy.
- Chicken Broth: Low-sodium is best, so you can control the saltiness of the final dish. You can also use chicken stock for a richer flavor.
- Heavy Cream: This adds richness and a luxurious texture to the gravy. You can substitute half-and-half for a slightly lighter version.
- Onion & Garlic: These aromatic powerhouses are essential for flavor.
- Butter: For sautéing and adding richness. Unsalted butter is my preference, as it gives you better control over the salt level.
- Olive Oil: For browning the chicken.
- Fresh Herbs: Thyme, rosemary, and parsley are fantastic additions. Dried herbs can be used in a pinch, but fresh is always best!
- Salt & Pepper: To taste. Don’t be shy! Seasoning is key.
- Optional: A splash of dry white wine can add a lovely depth of flavor to the gravy.
Step-by-Step Guide to Perfect Chicken and Gravy Stovetop
Alright, let’s get cooking! This is where the magic happens. Follow these steps carefully, and I promise you’ll be amazed at the results. Remember, don’t be afraid to experiment and adjust the seasonings to your liking.
- Prepare the Chicken: Pat the chicken dry with paper towels. This is crucial for achieving a good sear. Season generously with salt and pepper. Remember, properly seasoned chicken is happy chicken!
- Sear the Chicken: Heat olive oil in a large skillet over medium-high heat. Once the oil is shimmering (but not smoking!), carefully add the chicken in a single layer. Don’t overcrowd the pan; you may need to do this in batches.
- Brown Each Side: Sear the chicken for about 4-5 minutes per side, until golden brown and slightly crusty. This browning, known as the Maillard reaction, is what creates those delicious, complex flavors. Set the chicken aside on a plate.
- Sauté the Aromatics: Add the butter to the skillet. Once melted, add the chopped onion and cook until softened and translucent, about 5 minutes. Then, add the minced garlic and cook for another minute, until fragrant. Be careful not to burn the garlic!
- Make the Roux: Sprinkle the flour over the onions and garlic. Cook, stirring constantly, for 1-2 minutes. This creates a roux, which is the base of our gravy. It should be pale golden in color and smell slightly nutty. This step is crucial! Cooking the flour removes the raw flour taste and ensures a smooth gravy.
- Whisk in the Broth: Slowly whisk in the chicken broth, a little at a time, making sure to incorporate all the flour and prevent any lumps from forming. This is where a good whisk comes in handy! Keep whisking until the mixture is smooth.
- Add Herbs and Seasonings: Stir in the fresh thyme, rosemary (if using), and any other desired seasonings. Taste and adjust the salt and pepper as needed. Remember, you can always add more, but you can’t take it away!
- Simmer the Gravy: Bring the gravy to a simmer, then reduce the heat to low. Let it simmer for 5-7 minutes, or until thickened to your desired consistency. The longer it simmers, the richer the flavor will become.
- Return the Chicken to the Skillet: Place the seared chicken back into the skillet, nestling it into the gravy.
- Simmer the Chicken in Gravy: Cover the skillet and simmer for 15-20 minutes, or until the chicken is cooked through and reaches an internal temperature of 165°F (74°C). Use a meat thermometer to ensure accuracy.
- Add the Cream: Stir in the heavy cream (or half-and-half) and gently simmer for another 2-3 minutes, until heated through. Be careful not to boil the cream, as it can curdle.
- Garnish and Serve: Garnish with fresh parsley (if desired) and serve hot over mashed potatoes, rice, pasta, or biscuits. Enjoy every single bite!
Success Tips for Chicken and Gravy Perfection
Want to take your Chicken and Gravy Stovetop from good to absolutely AMAZING? Here are a few of my top secret tips to guarantee success!
- Don’t Skip the Searing! This is the secret to unlocking deep, savory flavors. That beautiful brown crust on the chicken is flavor GOLD.
- Low and Slow is Key for the Roux: Cooking the flour properly is essential for a smooth, lump-free gravy. Don’t rush this step!
- Taste as You Go: Seasoning is everything! Taste the gravy throughout the cooking process and adjust the salt, pepper, and herbs to your liking.
- Use a Meat Thermometer: This is the only way to ensure your chicken is cooked through without being dry.
- Let it Rest: After cooking, let the chicken rest in the gravy for a few minutes before serving. This allows the juices to redistribute, resulting in more tender and flavorful chicken.
Serving Suggestions: Beyond Mashed Potatoes
While mashed potatoes are the classic pairing for Chicken and Gravy Stovetop, don’t be afraid to get creative! Here are a few other delicious serving suggestions:
- Rice: Fluffy white rice, brown rice, or even wild rice are all fantastic options. The gravy soaks into the rice beautifully. Speaking of rice have you ever tried CREAMY CHICKEN AND RICE?
- Pasta: Egg noodles, fettuccine, or even penne pasta work well with this dish.
- Biscuits: Warm, flaky biscuits are perfect for soaking up all that delicious gravy.
- Polenta: Creamy polenta is a comforting and flavorful alternative to mashed potatoes.
- Vegetables: Serve with a side of steamed green beans, roasted broccoli, or a fresh salad for a complete and balanced meal.
Variations and Adaptations: Make it Your Own!
The beauty of Chicken and Gravy Stovetop is that it’s incredibly versatile. Feel free to experiment with different ingredients and flavors to create your own signature version!
- Mushroom Chicken and Gravy: Add sliced mushrooms to the skillet along with the onions and garlic for a earthy flavor.
- Creamy Herb Chicken and Gravy: Use a variety of fresh herbs, such as thyme, rosemary, sage, and parsley, for a complex and aromatic flavor.
- Spicy Chicken and Gravy: Add a pinch of red pepper flakes or a dash of hot sauce to the gravy for a little kick. If you like spicy meals you will love CAJUN CHICKEN SOUP HEAVEN.
- Wine-Infused Gravy: Deglaze the pan with a splash of dry white wine after sautéing the onions and garlic for a deeper, more complex flavor.
- Chicken Thighs Only: Using only chicken thighs can add a lot more flavor to this recipe.
Storing and Reheating: Enjoying Leftovers
If you’re lucky enough to have leftovers (which is unlikely!), they can be stored in an airtight container in the refrigerator for up to 3-4 days. To reheat, simply warm gently in a skillet over medium heat, adding a splash of chicken broth or water if needed to prevent the gravy from drying out. You can also reheat it in the microwave, but be sure to stir it occasionally to ensure even heating. This is also a great way to make CHICKEN DUMPLING SOUP , because the chicken is already cooked!
Troubleshooting: Addressing Common Concerns
Sometimes, things don’t go exactly as planned in the kitchen. Don’t worry! Here are some common issues and how to fix them:
- Lumpy Gravy: This usually happens when the flour isn’t properly incorporated. To fix it, try whisking vigorously or using an immersion blender to smooth out the lumps. You can also strain the gravy through a fine-mesh sieve.
- Thin Gravy: If your gravy is too thin, you can thicken it by simmering it for a longer period of time, allowing the liquid to evaporate. Alternatively, you can whisk together a tablespoon of cornstarch with two tablespoons of cold water and stir it into the gravy.
- Thick Gravy: If your gravy is too thick, simply add a little more chicken broth or water until it reaches your desired consistency.
- Dry Chicken: Overcooked chicken is the most common cause of dryness. Use a meat thermometer to ensure you don’t overcook the chicken. If your chicken is already dry, try shredding it and stirring it back into the gravy. The gravy will help to moisten the chicken. Maybe shred it and add some toasted buns to make CHICKEN SLIDERS!
- Bland Gravy: Taste and adjust the seasonings! Add more salt, pepper, herbs, or a splash of lemon juice to brighten the flavor.
The Perfect Pairing: What to Serve Alongside
To create a complete and satisfying meal, consider adding a few complementary side dishes. Here are some of my favorites:
- Green Beans Almondine: Steamed green beans topped with toasted almonds and a lemon butter sauce.
- Roasted Asparagus: Tender asparagus spears roasted with olive oil, salt, and pepper.
- Garlic Bread: Crispy garlic bread is perfect for soaking up all that delicious gravy.
- Mashed Sweet Potatoes: A sweet and savory side dish that complements the richness of the chicken and gravy.
- Corn on the Cob: Fresh corn on the cob, grilled or boiled, is a simple and satisfying addition to any meal.
Beyond the Basics: Leveling Up Your Chicken and Gravy
Once you’ve mastered the basic Chicken and Gravy Stovetop recipe, you can start experimenting with more advanced techniques to elevate your dish to the next level. Think about trying CHICKEN TORTELLINI HEAVEN, another great recipe that incorporates chicken.
- Homemade Chicken Broth: Using homemade chicken broth will significantly enhance the flavor of your gravy.
- Deglazing with Wine or Sherry: Adding a splash of dry white wine or sherry to the pan after sautéing the onions and garlic will add depth and complexity to the gravy.
- Infusing the Gravy with Herbs: Simmering the gravy with fresh herbs like rosemary, thyme, and sage will infuse it with a delightful aromatic flavor.
- Adding a Touch of Acidity: A squeeze of lemon juice or a splash of balsamic vinegar will brighten the flavor of the gravy and balance the richness.
- Using Bone-In, Skin-On Chicken: While boneless, skinless chicken is convenient, using bone-in, skin-on chicken will result in a more flavorful and juicy dish. Be sure to sear the chicken skin-side down first to render the fat and create crispy skin.
Why This Recipe is a Winner
This Chicken and Gravy Stovetop recipe isn’t just about following instructions; it’s about creating a comforting, soul-satisfying meal that will bring joy to your family and friends. It’s about taking simple ingredients and transforming them into something truly special. It’s about making memories in the kitchen and sharing them around the table.
So, go ahead, give it a try! Don’t be afraid to experiment and make it your own. I promise, you won’t be disappointed. And who knows, maybe this will become a cherished family recipe, passed down from generation to generation, just like my Grandma Rose’s.
A Final Note: Patience is a Virtue
Remember, cooking is a journey, not a race. Take your time, enjoy the process, and don’t be afraid to make mistakes. The most important ingredient is always love. Happy cooking!
What are the key ingredients needed to make the Chicken and Gravy?
You’ll need chicken (breasts or thighs), all-purpose flour, chicken broth (low-sodium preferred), heavy cream, onion, garlic, butter, olive oil, fresh herbs (thyme, rosemary, parsley), salt, and pepper. A splash of dry white wine is optional.
Why is cooking the chicken and gravy on the stovetop recommended?
Stovetop cooking is faster, more hands-on, and allows for better flavor development. You have more control over the heat, resulting in perfectly cooked chicken and a luscious gravy. Plus, cleanup is easier.
What are some tips to avoid common problems when making chicken and gravy?
To avoid lumpy gravy, whisk the broth slowly and thoroughly into the roux. To prevent thin gravy, simmer it longer to reduce the liquid. Prevent dry chicken by using a meat thermometer and not overcooking. For bland gravy, adjust seasonings to taste.
What are some alternative serving suggestions besides mashed potatoes?
Besides mashed potatoes, you can serve the Chicken and Gravy over rice, pasta, biscuits, polenta, or with a side of steamed green beans or roasted broccoli.

ULTIMATE CHICKEN GRAVY PERFECTION
Equipment
- large skillet with lid
- Cutting board
- Chef’s knife
- Measuring cups and spoons
- Whisk
- Spatula or wooden spoon
- Meat thermometer
- Paper towels
- Plate
Ingredients
- 2 pounds boneless, skinless chicken breasts or thighs, or a mix
- ¼ cup olive oil
- 4 tablespoons unsalted butter
- 1 medium yellow onion, chopped
- 2 cloves garlic, minced
- ¼ cup all-purpose flour
- 3 cups low-sodium chicken broth
- ½ cup heavy cream
- 1 tablespoon fresh thyme leaves
- 1 tablespoon fresh rosemary, chopped optional
- 2 tablespoons fresh parsley, chopped
- Salt and black pepper to taste
- ¼ cup dry white wine optional
- Mashed potatoes, rice, pasta, or biscuits for serving
Instructions
- Pat the chicken dry with paper towels and season generously with salt and pepper.
- Heat olive oil in a large skillet over medium-high heat until shimmering.
- Carefully add the chicken to the skillet in a single layer (work in batches if necessary) and sear for 4-5 minutes per side, until golden brown and slightly crusty. Remove the chicken from the skillet and set aside on a plate.
- Add butter to the skillet. Once melted, add the chopped onion and cook until softened and translucent, about 5 minutes. Add the minced garlic and cook for another minute, until fragrant.
- Sprinkle the flour over the onions and garlic. Cook, stirring constantly, for 1-2 minutes, until the flour is pale golden in color and smells slightly nutty.
- Slowly whisk in the chicken broth, a little at a time, making sure to incorporate all the flour and prevent any lumps from forming. Keep whisking until the mixture is smooth.
- If using, deglaze the pan with white wine, scraping up any browned bits from the bottom of the pan.
- Stir in the fresh thyme, rosemary (if using), and any other desired seasonings. Taste and adjust the salt and pepper as needed.
- Bring the gravy to a simmer, then reduce the heat to low. Let it simmer for 5-7 minutes, or until thickened to your desired consistency.
- Place the seared chicken back into the skillet, nestling it into the gravy.
- Cover the skillet and simmer for 15-20 minutes, or until the chicken is cooked through and reaches an internal temperature of 165°F (74°C).
- Stir in the heavy cream (or half-and-half) and gently simmer for another 2-3 minutes, until heated through. Be careful not to boil the cream.
- Garnish with fresh parsley (if desired) and serve hot over mashed potatoes, rice, pasta, or biscuits.
