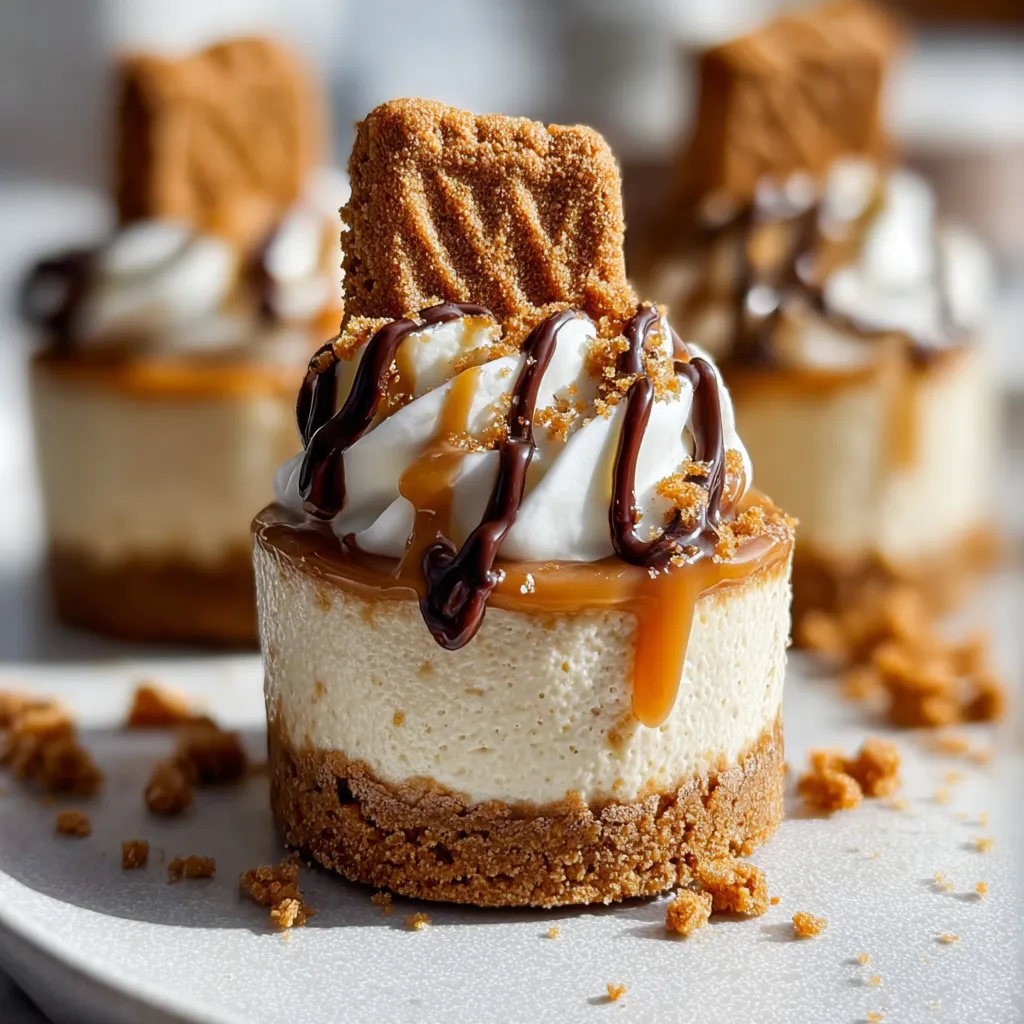
Craving a dessert that’s both comforting and a little bit fancy, without requiring hours in the kitchen? These Mini Biscoff Cheesecakes deliver the perfect balance of creamy, rich cheesecake filling and the warm, spiced flavor of Biscoff cookies. I promise you’ll be amazed at how easy it is to create these little bites of heaven!
Table of Contents
Ingredients
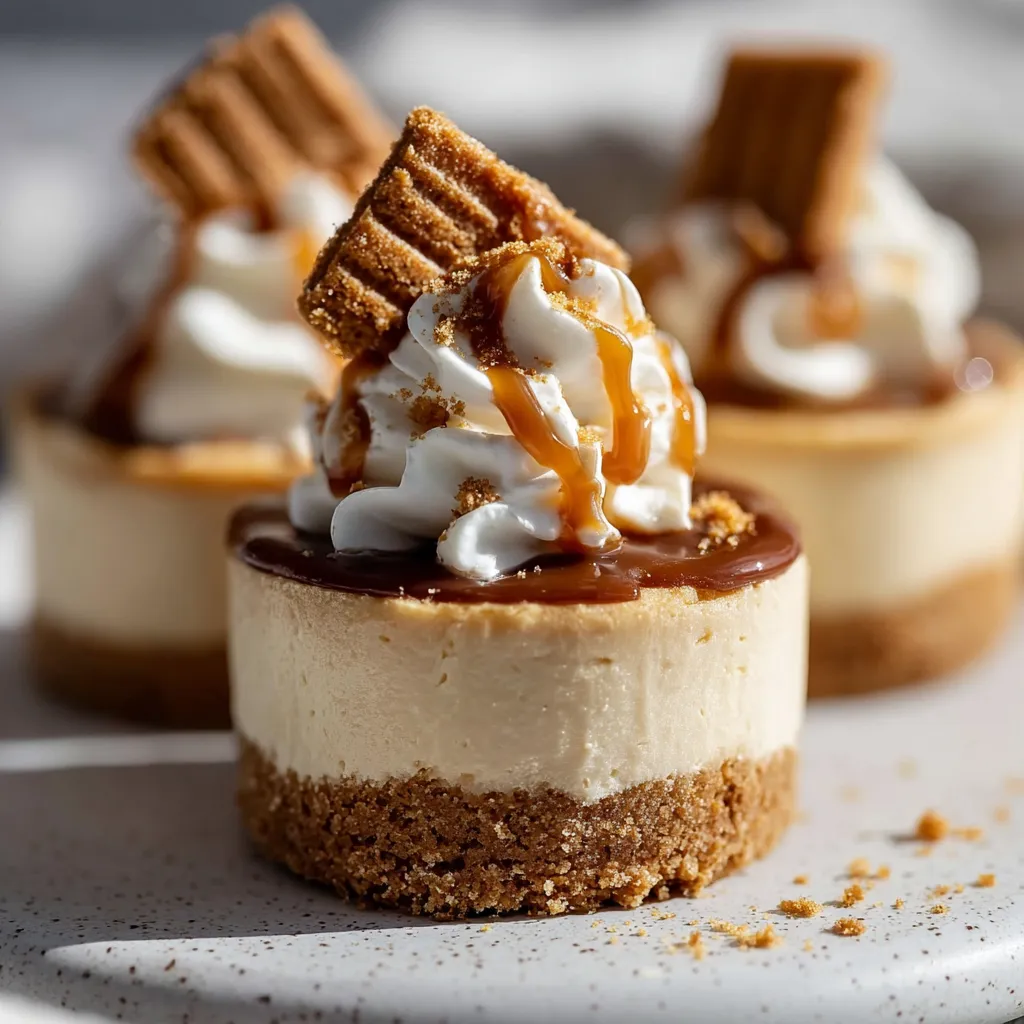
For the Crust:
- 1 1/2 cups Biscoff cookies, finely crushed (about 24 cookies)
- 5 tablespoons unsalted butter, melted
For the Cheesecake Filling:
- 16 ounces cream cheese, softened
- 1/2 cup granulated sugar
- 1/4 cup Biscoff Cookie Butter, melted
- 2 large eggs
- 1/4 cup heavy cream
- 1 teaspoon vanilla extract
- Pinch of salt
For the Topping (Optional):
- Biscoff cookies, halved or crushed
- Biscoff Cookie Butter, melted and drizzled
Essential Equipment: The Mini Cheesecake Pan
You absolutely *can* make cheesecakes in a standard springform pan, but for these adorable individual servings, a Mini Cheesecake Pan is your best friend. These pans usually have removable bottoms, which makes getting the cheesecakes out a breeze. No sticking, no crumbling – just perfectly formed little cheesecakes! If you don’t have one yet, trust me, it’s a worthwhile investment, especially if you love making desserts for parties or just want portion control. They are also really helpful for the Fall Cheesecake Cookie Bombs recipe too.
Making the Biscoff Crust: The Foundation of Flavor
The crust is where the Biscoff magic really starts! Finely crushing the cookies is key to a good crust that holds together. A food processor works wonders, but you can also put the cookies in a zip-top bag and crush them with a rolling pin. Just make sure there aren’t any large chunks left. Melting the butter ensures the crust binds properly.
Tips for a Perfect Crust:
- Even Crushing: Aim for a consistent crumb size to prevent a crumbly crust.
- Press Firmly: When pressing the crust into the Mini Cheesecake Pan, use the bottom of a measuring cup or your fingers to create a compact layer.
- Pre-Bake (Optional): For an extra sturdy crust, pre-bake it at 350°F (175°C) for 5-7 minutes. This helps it set and prevents it from becoming soggy.
Crafting the Rich Cheesecake Filling
Now for the star of the show: that luxuriously rich cheesecake filling. The secret to a creamy cheesecake is using softened cream cheese. If it’s still cold, you’ll end up with lumps in your batter. Allow the cream cheese to sit at room temperature for at least an hour before you start.
Incorporating the Biscoff Cookie Butter is what elevates this cheesecake from good to extraordinary. Make sure it’s melted for easy incorporation and to prevent clumping. I love the addition of heavy cream for that extra richness, but you can substitute sour cream if you prefer a slightly tangier flavor. You can even add some to the Strawberry Cheesecake Dump Cake to give it that extra edge!
Tips for a Smooth Filling:
- Softened Cream Cheese: This is non-negotiable!
- Don’t Overmix: Overmixing can incorporate too much air into the batter, which can cause cracks during baking. Mix until just combined.
- Low and Slow: Baking at a lower temperature helps prevent the cheesecake from cracking.
Step-by-Step Instructions
- Prepare the Crust: In a medium bowl, combine the crushed Biscoff cookies and melted butter. Mix well until evenly moistened.
- Press into Pan: Press the mixture into the bottom of each cavity of your Mini Cheesecake Pan. Use the bottom of a measuring cup or your fingers to create a compact, even layer.
- Make the Filling: In a large bowl, beat the softened cream cheese and granulated sugar until smooth and creamy.
- Add Biscoff Cookie Butter: Beat in the melted Biscoff Cookie Butter until well combined.
- Incorporate Eggs: Beat in the eggs one at a time, mixing well after each addition.
- Add Remaining Ingredients: Stir in the heavy cream, vanilla extract, and salt. Mix until just combined.
- Pour Filling: Pour the cheesecake filling over the Biscoff crusts, filling each cavity almost to the top.
- Bake: Bake in a preheated oven at 325°F (160°C) for 20-25 minutes, or until the edges are set and the center is slightly jiggly.
- Cool: Turn off the oven and let the cheesecakes cool inside the oven with the door slightly ajar for 30 minutes. This helps prevent cracking.
- Refrigerate: Transfer the cheesecakes to the refrigerator and chill for at least 4 hours, or preferably overnight.
- Garnish (Optional): Before serving, garnish with halved or crushed Biscoff cookies and a drizzle of melted Biscoff Cookie Butter.
- Serve: Carefully remove the cheesecakes from the Mini Cheesecake Pan by gently pushing up on the removable bottoms. Serve chilled and enjoy!
Troubleshooting and Pro Tips
Cheesecakes can be a little finicky, but don’t let that intimidate you! Here are some common issues and how to avoid them:
- Cracked Cheesecakes: The dreaded crack! This is usually caused by baking at too high a temperature or overbaking. The gradual cooling method outlined above helps prevent this. You can also place a pan of water on the bottom rack of the oven to create a more humid environment.
- Soggy Crust: Ensure your crust is pressed firmly into the pan and consider pre-baking it for a few minutes.
- Lumpy Filling: Make sure your cream cheese is completely softened and don’t overmix the batter.
Variations and Customization
The beauty of this recipe is its versatility! Here are some ideas to customize your Mini Biscoff Cheesecakes:
- Chocolate Drizzle: Drizzle melted chocolate over the cheesecakes for a decadent twist. I bet it would be heavenly in a Chocolate Chip Cheesecake Heaven, too!
- Espresso Infusion: Add a teaspoon of instant espresso powder to the filling for a coffee-Biscoff flavor combination.
- Different Crust: While Biscoff cookies are the star here, you could experiment with other cookies like graham crackers or Oreos.
- Spiced Cheesecake: Add a pinch of cinnamon or nutmeg to the filling for a warm, spiced flavor.
- Biscoff Swirl: Reserve some of the melted Biscoff Cookie Butter and swirl it into the cheesecake filling before baking for a marbled effect. I wonder if it would work well in Apple Cider Cheesecake Cookies?
The Magic of Biscoff Cookie Butter
Biscoff Cookie Butter is truly a game-changer. If you’re not familiar with it, it’s a spread made from ground Biscoff cookies. It has a unique, caramelized flavor with hints of cinnamon and other spices. It’s incredibly versatile and can be used in so many ways: spread on toast, added to smoothies, or, of course, used in baking like these delicious Mini Biscoff Cheesecakes.
Serving Suggestions
These Mini Biscoff Cheesecakes are perfect for any occasion! Serve them at parties, potlucks, or simply as a special treat for yourself. They also make a thoughtful and delicious gift. A few other fun ways to serve them are:
- Top with whipped cream for a lighter, airier feel.
- Serve with a scoop of vanilla ice cream.
- Offer a variety of toppings so your guests can customize their own mini cheesecakes. It would be perfect alongside a slice of Churro Cheesecake at a party!
Storing Your Mini Masterpieces
Leftover Mini Biscoff Cheesecakes can be stored in an airtight container in the refrigerator for up to 3-4 days. They can also be frozen for longer storage. To freeze, wrap each cheesecake individually in plastic wrap and then place them in a freezer-safe container. They can be frozen for up to 2-3 months. Thaw in the refrigerator overnight before serving.
Why You’ll Love These Mini Biscoff Cheesecakes
These Mini Biscoff Cheesecakes are the perfect combination of creamy, rich, and spiced flavors. They’re easy to make, require minimal ingredients, and are always a crowd-pleaser. Plus, the individual servings make them ideal for portion control (if you can resist eating more than one!). From the Biscoff crust to the Biscoff Cookie Butter infused filling, every bite is an explosion of flavor. You will love these just as much as the Dreamiest Sugar Cookie Cheesecake! So, go ahead and give this recipe a try. I know you’ll love them as much as I do!
What is the key to preventing cracks in the mini cheesecakes?
Baking at a lower temperature (325°F/160°C) and allowing the cheesecakes to cool gradually in the oven with the door slightly ajar helps prevent cracking. You can also place a pan of water on the bottom rack of the oven to create a more humid environment.
What can I do if my cream cheese isn’t soft enough?
The recipe emphasizes that softened cream cheese is crucial. If it’s not soft enough, you’ll end up with lumps in your batter. Allow the cream cheese to sit at room temperature for at least an hour before you start.
Can I use something other than Biscoff cookies for the crust?
Yes, while Biscoff cookies are recommended, you can experiment with other cookies like graham crackers or Oreos for the crust.
How long can I store leftover mini Biscoff cheesecakes?
Leftover mini Biscoff cheesecakes can be stored in an airtight container in the refrigerator for up to 3-4 days. They can also be frozen for longer storage, up to 2-3 months if wrapped individually and placed in a freezer-safe container.
Irresistible Mini Biscoff Cheesecakes
Equipment
- Mini cheesecake pan with removable bottoms
- Medium bowl
- Large bowl
- Electric mixer (hand or stand)
- Measuring cups and spoons
- Food processor or zip-top bag and rolling pin
- Oven
- Rubber spatula
- Whisk
Ingredients
- 1 ½ cups Biscoff cookies, finely crushed about 24 cookies
- 5 tablespoons unsalted butter, melted
- 16 ounces cream cheese, softened
- ½ cup granulated sugar
- ¼ cup Biscoff Cookie Butter, melted
- 2 large eggs
- ¼ cup heavy cream
- 1 teaspoon vanilla extract
- Pinch of salt
- Biscoff cookies, halved or crushed for topping
- Biscoff Cookie Butter, melted for drizzling
Instructions
- Preheat oven to 325°F (160°C).
- In a medium bowl, combine the crushed Biscoff cookies and melted butter. Mix well until evenly moistened.
- Press the mixture into the bottom of each cavity of your mini cheesecake pan. Use the bottom of a measuring cup or your fingers to create a compact, even layer.
- In a large bowl, beat the softened cream cheese and granulated sugar until smooth and creamy.
- Beat in the melted Biscoff Cookie Butter until well combined.
- Beat in the eggs one at a time, mixing well after each addition.
- Stir in the heavy cream, vanilla extract, and salt. Mix until just combined.
- Pour the cheesecake filling over the Biscoff crusts, filling each cavity almost to the top.
- Bake in the preheated oven for 20-25 minutes, or until the edges are set and the center is slightly jiggly.
- Turn off the oven and let the cheesecakes cool inside the oven with the door slightly ajar for 30 minutes. This helps prevent cracking.
- Transfer the cheesecakes to the refrigerator and chill for at least 4 hours, or preferably overnight.
- Before serving, garnish with halved or crushed Biscoff cookies and a drizzle of melted Biscoff Cookie Butter.
- Carefully remove the cheesecakes from the mini cheesecake pan by gently pushing up on the removable bottoms. Serve chilled and enjoy!
