No Bake Fireworks Oreo Cheesecake Bars: A Step-by-Step Guide to Patriotic Perfection

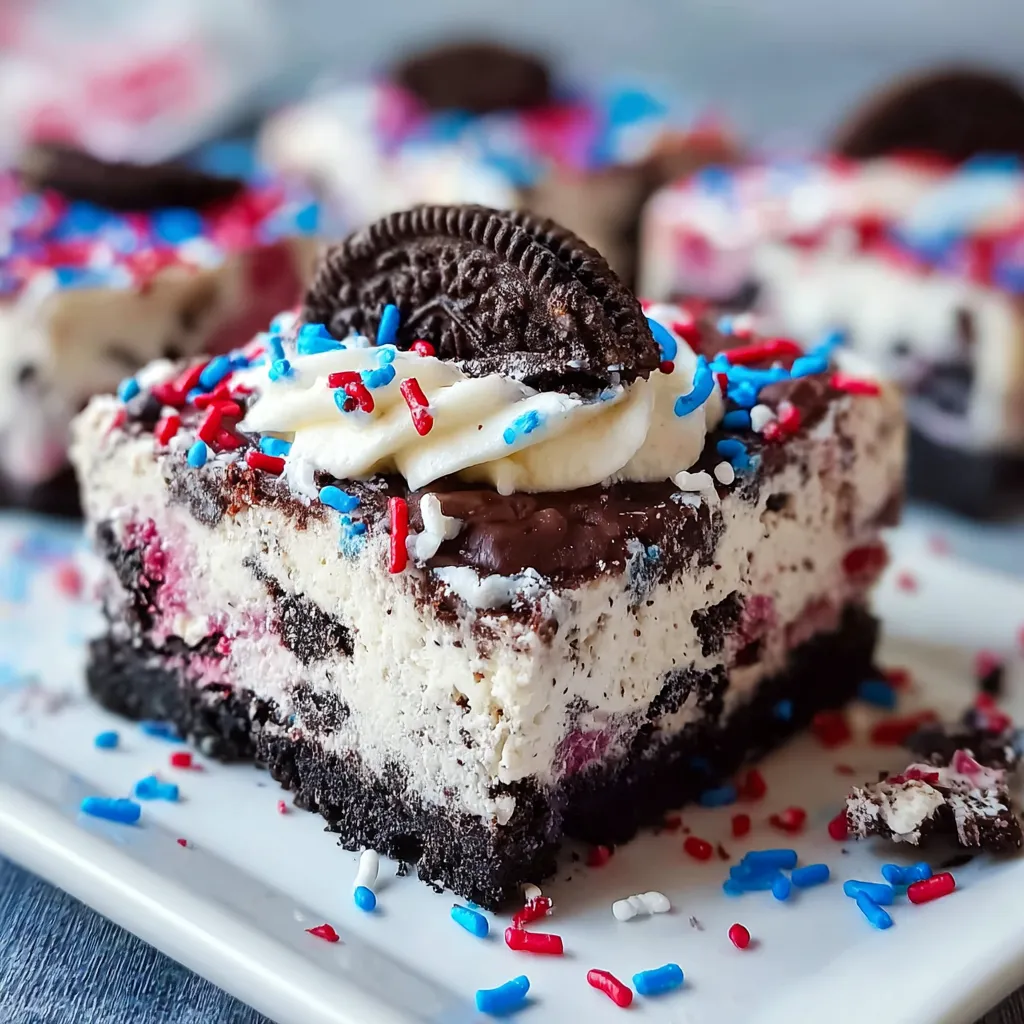
Hey there, dessert enthusiasts! Get ready to ignite your taste buds with these absolutely stunning No Bake Fireworks Oreo Cheesecake Bars. These bars are not only incredibly easy to make (seriously, no baking required!), but they’re also a guaranteed crowd-pleaser, especially for those summer barbecues and Fourth of July celebrations. I’m talking creamy, dreamy cheesecake filling, a crunchy Oreo crust, and a dazzling display of red, white, and blue sprinkles that scream “party!” Let’s dive into how to create these showstoppers!
What Makes These Cheesecake Bars So Irresistible?
Okay, let’s be real. There are a million and one cheesecake recipes out there, but what makes these particular bars so special? For starters, the no-bake aspect is a total game-changer, especially when it’s hot outside and the last thing you want to do is crank up the oven. Plus, the Oreo crust adds a delightful chocolatey crunch that perfectly complements the tangy cheesecake filling. And, of course, the “fireworks” sprinkles add that festive touch that makes these bars truly unforgettable. I promise, they’re as much fun to make as they are to eat!
Ingredients You’ll Need
Before we get started, let’s gather our ingredients. Don’t worry, most of these are pantry staples!
- For the Oreo Crust:
- 24 Oreo cookies (regular or Double Stuf, your choice!)
- 5 tablespoons unsalted butter, melted
- For the Cheesecake Filling:
- 16 ounces cream cheese, softened to room temperature
- 1 (14 ounce) can sweetened condensed milk
- 1/4 cup lemon juice
- 1 teaspoon vanilla extract
- 1 cup heavy whipping cream
- For the Fireworks Topping:
- Red, white, and blue sprinkles (or any festive sprinkles you love!)
- Optional: Whipped cream for serving
Step-by-Step Instructions: Let’s Get Baking (Without Baking!)
Alright, let’s get our hands dirty (or maybe just a little sticky!). Follow these simple steps, and you’ll have a batch of gorgeous No Bake Fireworks Oreo Cheesecake Bars in no time.
- Prepare the Oreo Crust: Place the Oreo cookies in a food processor and pulse until they are finely crushed. Alternatively, you can place them in a large zip-top bag and crush them with a rolling pin.
- Combine Crust Ingredients: In a medium bowl, combine the crushed Oreo cookies and the melted butter. Mix well until the mixture is evenly moistened and resembles wet sand.
- Press the Crust: Press the Oreo mixture into the bottom of a 9×13 inch baking pan lined with parchment paper. Use the bottom of a measuring cup or your fingers to firmly press the crust into an even layer. This is crucial for a stable base!
- Chill the Crust: Place the pan in the refrigerator to chill while you prepare the cheesecake filling. This will help the crust set and prevent it from crumbling.
- Beat the Cream Cheese: In a large bowl, beat the softened cream cheese with an electric mixer until smooth and creamy. Make sure there are no lumps! This usually takes about 2-3 minutes on medium speed.
- Add Sweetened Condensed Milk: Gradually add the sweetened condensed milk to the cream cheese, mixing on low speed until well combined. Scrape down the sides of the bowl as needed to ensure everything is evenly incorporated.
- Add Lemon Juice and Vanilla: Stir in the lemon juice and vanilla extract. The lemon juice adds a subtle tang that balances the sweetness of the condensed milk.
- Whip the Heavy Cream: In a separate bowl, whip the heavy whipping cream with an electric mixer until stiff peaks form. This is what gives the cheesecake filling its light and airy texture. Be careful not to overwhip!
- Fold in the Whipped Cream: Gently fold the whipped cream into the cream cheese mixture until just combined. Be careful not to deflate the whipped cream.
- Pour the Filling: Pour the cheesecake filling over the chilled Oreo crust, spreading it evenly with a spatula.
- Chill the Cheesecake: Cover the pan with plastic wrap and refrigerate for at least 4 hours, or preferably overnight. This allows the cheesecake to set completely.
- Decorate with Fireworks: Once the cheesecake is set, remove it from the refrigerator and sprinkle generously with red, white, and blue sprinkles. Get creative with your designs!
- Cut and Serve: Cut the cheesecake into bars and serve. You can add a dollop of whipped cream for an extra touch of indulgence.
Success Tips for Perfect No Bake Oreo Cheesecake Bars
Want to ensure your No Bake Fireworks Oreo Cheesecake Bars are a total success? Here are a few golden tips to keep in mind:
- Soften the Cream Cheese: This is absolutely crucial! Make sure your cream cheese is completely softened to room temperature before you start. Otherwise, you’ll end up with lumpy cheesecake.
- Don’t Overmix: Overmixing the cheesecake filling can result in a dense, heavy texture. Mix only until the ingredients are just combined.
- Chill Time is Key: Resist the urge to cut into the cheesecake before it’s fully chilled. The longer it chills, the firmer and more stable it will be.
- Lining the Pan: Lining the baking pan with parchment paper makes it super easy to lift the cheesecake out and cut it into neat bars. Trust me, it’s worth the extra step!
- Get Creative with Toppings: Don’t limit yourself to just sprinkles! You can also add crushed Oreos, chocolate shavings, or even a drizzle of melted chocolate for an extra layer of deliciousness.
Variations and Customizations
One of the best things about this recipe is how easily you can customize it to suit your taste. Here are a few ideas to get you started:
- Different Oreo Flavors: Experiment with different Oreo flavors, such as Golden Oreos, Mint Oreos, or even Birthday Cake Oreos.
- Chocolate Chips: Add chocolate chips to the cheesecake filling for an extra chocolatey treat.
- Fruit Swirl: Swirl in some fruit preserves, such as strawberry or raspberry, for a fruity twist.
- Individual Cheesecakes: Instead of making bars, you can make individual cheesecakes in muffin tins. Simply press the Oreo crust into the bottom of each muffin liner and fill with the cheesecake mixture.
- Boozy Boost: Add a tablespoon or two of your favorite liqueur, such as Bailey’s or Kahlua, to the cheesecake filling for an adult-friendly treat.
Make-Ahead and Storage Instructions
These No Bake Fireworks Oreo Cheesecake Bars are perfect for making ahead of time. In fact, I highly recommend it! They can be stored in the refrigerator for up to 3-4 days. Just make sure to cover them tightly with plastic wrap to prevent them from drying out.
For longer storage, you can freeze the cheesecake bars. To freeze, cut the cheesecake into bars and place them on a baking sheet lined with parchment paper. Freeze for about 2 hours, or until solid. Then, transfer the frozen bars to a freezer-safe container or zip-top bag. They can be stored in the freezer for up to 2-3 months. When ready to serve, thaw the bars in the refrigerator overnight.
Pairing Suggestions
These No Bake Fireworks Oreo Cheesecake Bars are delicious on their own, but they also pair well with a variety of other treats and beverages. Here are a few suggestions:
- Fresh Fruit: Serve the cheesecake bars with a side of fresh berries, such as strawberries, blueberries, or raspberries.
- Whipped Cream: A dollop of whipped cream adds an extra touch of indulgence.
- Ice Cream: Pair the cheesecake bars with a scoop of vanilla or chocolate ice cream for a decadent dessert.
- Coffee or Tea: A cup of coffee or tea is the perfect complement to the rich and creamy cheesecake.
- Sparkling Wine: For a more festive occasion, pair the cheesecake bars with a glass of sparkling wine or champagne.
Other Delicious Cheesecake Inspired Recipes
If you love cheesecake as much as I do, then you’re in for a treat! Here are a few other cheesecake-inspired recipes that I think you’ll absolutely adore.
First, for a delightful fall treat, you absolutely have to try my Caramel Apple Cheesecake Dip. It’s the perfect appetizer for any autumn gathering! Or, if you want individual servings of fall goodness, check out these Apple Crisp Mini Cheesecakes. They’re fall dessert goals achieved, I promise!
For a taste of summer, my Strawberry Cheesecake Dump Cake is the easiest dessert ever, perfect for those last-minute get-togethers. And if you’re feeling a little more ambitious, the Strawberry Shortcake Cheesecake Roll is an absolute showstopper. It truly lives up to its “OMG” status.
Don’t forget about cookies! My Cinnamon Cheesecake Cookies have a magic secret ingredient that makes them unbelievably soft and chewy. And for the chocolate lovers, the Chocolate Swirl Cheesecake is a decadent dessert twist that’s sure to satisfy your cravings!
Troubleshooting Tips
Even with the best instructions, sometimes things can go a little sideways in the kitchen. Here are a few common issues you might encounter and how to fix them:
- Lumpy Cheesecake Filling: If your cheesecake filling is lumpy, it’s likely because your cream cheese wasn’t soft enough. Try beating the mixture for a longer period of time, or gently warm the cream cheese in the microwave for a few seconds (be careful not to melt it!).
- Crust is Too Crumbly: If your Oreo crust is too crumbly, try adding a little more melted butter. Start with a tablespoon at a time, and mix until the mixture holds together when pressed.
- Cheesecake is Too Soft: If your cheesecake is too soft after chilling, it may not have chilled for long enough. Place it back in the refrigerator for a few more hours, or even overnight.
- Sprinkles are Sinking: If your sprinkles are sinking into the cheesecake filling, try chilling the cheesecake for a shorter period of time before adding the sprinkles. You can also gently press the sprinkles into the filling to help them adhere.
Final Thoughts
And there you have it! My ultimate guide to making the most amazing No Bake Fireworks Oreo Cheesecake Bars. I hope you enjoy making these as much as I do, and I can’t wait to see your creations! Don’t forget to share your photos with me on social media using #BestHomemadeRecipes – I love seeing what you come up with. Happy baking (or should I say, no-baking!), and have a fantastic celebration!
How long can I store these No Bake Fireworks Oreo Cheesecake Bars?
You can store them in the refrigerator for up to 3-4 days, covered tightly with plastic wrap. For longer storage, you can freeze them for up to 2-3 months. Freeze the bars individually first, then transfer to a freezer-safe container.
What can I do if my cheesecake filling is lumpy?
If your cheesecake filling is lumpy, it’s likely because your cream cheese wasn’t soft enough. Try beating the mixture for a longer period of time, or gently warm the cream cheese in the microwave for a few seconds (be careful not to melt it!).
Can I use different Oreo flavors for the crust?
Yes! You can experiment with different Oreo flavors, such as Golden Oreos, Mint Oreos, or even Birthday Cake Oreos, to customize the crust to your liking.
What’s the best way to ensure the Oreo crust doesn’t crumble?
Make sure the crushed Oreo cookies are evenly moistened with the melted butter, resembling wet sand. Also, firmly press the mixture into the bottom of the pan to create a stable base.

Fireworks Oreo Cheesecake Bars
Equipment
- 9×13 inch baking pan
- Parchment paper
- Food processor or zip-top bag and rolling pin
- Medium bowl
- Large bowl
- Electric mixer
- Spatula
- Measuring cups and spoons
- Plastic Wrap
Ingredients
- 24 Oreo cookies regular or Double Stuf
- 5 tablespoons unsalted butter, melted
- 16 ounces cream cheese, softened
- ¼ cup lemon juice
- 1 teaspoon vanilla extract
- 1 cup heavy whipping cream
- Red, white, and blue sprinkles
Instructions
- Prepare the Oreo Crust: Place the Oreo cookies in a food processor and pulse until they are finely crushed. Alternatively, you can place them in a large zip-top bag and crush them with a rolling pin.
- Combine Crust Ingredients: In a medium bowl, combine the crushed Oreo cookies and the melted butter. Mix well until the mixture is evenly moistened and resembles wet sand.
- Press the Crust: Press the Oreo mixture into the bottom of a 9×13 inch baking pan lined with parchment paper. Use the bottom of a measuring cup or your fingers to firmly press the crust into an even layer.
- Chill the Crust: Place the pan in the refrigerator to chill while you prepare the cheesecake filling.
- Beat the Cream Cheese: In a large bowl, beat the softened cream cheese with an electric mixer until smooth and creamy. Make sure there are no lumps!
- Add Sweetened Condensed Milk: Gradually add the sweetened condensed milk to the cream cheese, mixing on low speed until well combined. Scrape down the sides of the bowl as needed to ensure everything is evenly incorporated.
- Add Lemon Juice and Vanilla: Stir in the lemon juice and vanilla extract.
- Whip the Heavy Cream: In a separate bowl, whip the heavy whipping cream with an electric mixer until stiff peaks form. Be careful not to overwhip!
- Fold in the Whipped Cream: Gently fold the whipped cream into the cream cheese mixture until just combined. Be careful not to deflate the whipped cream.
- Pour the Filling: Pour the cheesecake filling over the chilled Oreo crust, spreading it evenly with a spatula.
- Chill the Cheesecake: Cover the pan with plastic wrap and refrigerate for at least 4 hours, or preferably overnight. This allows the cheesecake to set completely.
- Decorate with Fireworks: Once the cheesecake is set, remove it from the refrigerator and sprinkle generously with red, white, and blue sprinkles. Get creative with your designs!
- Cut and Serve: Cut the cheesecake into bars and serve. You can add a dollop of whipped cream for an extra touch of indulgence.


