I still remember the first time I attempted to make pie crust from scratch. It was a sticky, buttery disaster! Yet, the memory of my grandmother patiently guiding me, her hands dusted with flour, is forever etched in my heart. It’s that same spirit of warmth and homemade goodness that I want to share with you as we embark on making a spectacular Home-baked Apple Slab Pie. Today, I’m sharing all my secrets for the most amazing Home-baked Apple Slab Pie you’ll ever make!
The Ultimate Home-Baked Apple Slab Pie: A Step-by-Step Guide
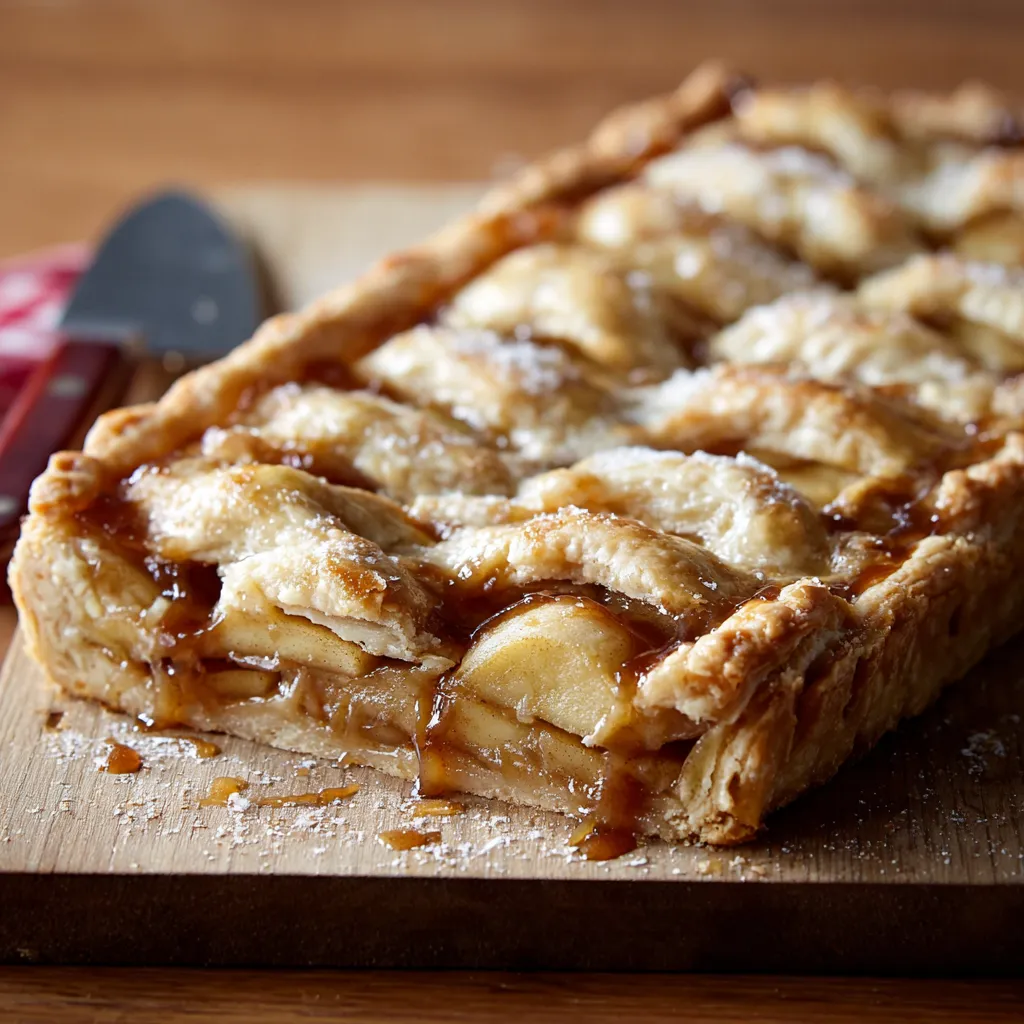
Okay, friends, let’s get real. Apple pie is fantastic, but an Apple Slab Pie? That’s a party waiting to happen! It’s perfect for potlucks, family gatherings, or even just a cozy Sunday afternoon. The beauty of a slab pie is its generous size and ease of serving – no meticulously cutting perfect slices required! Plus, the crust-to-filling ratio is pure perfection. Let’s dive in and bake the best apple slab pie you have ever tasted!
What Makes This Apple Slab Pie So Special?
This isn’t just any apple pie recipe; it’s a labor of love, tweaked and perfected over years. Here’s what sets it apart:
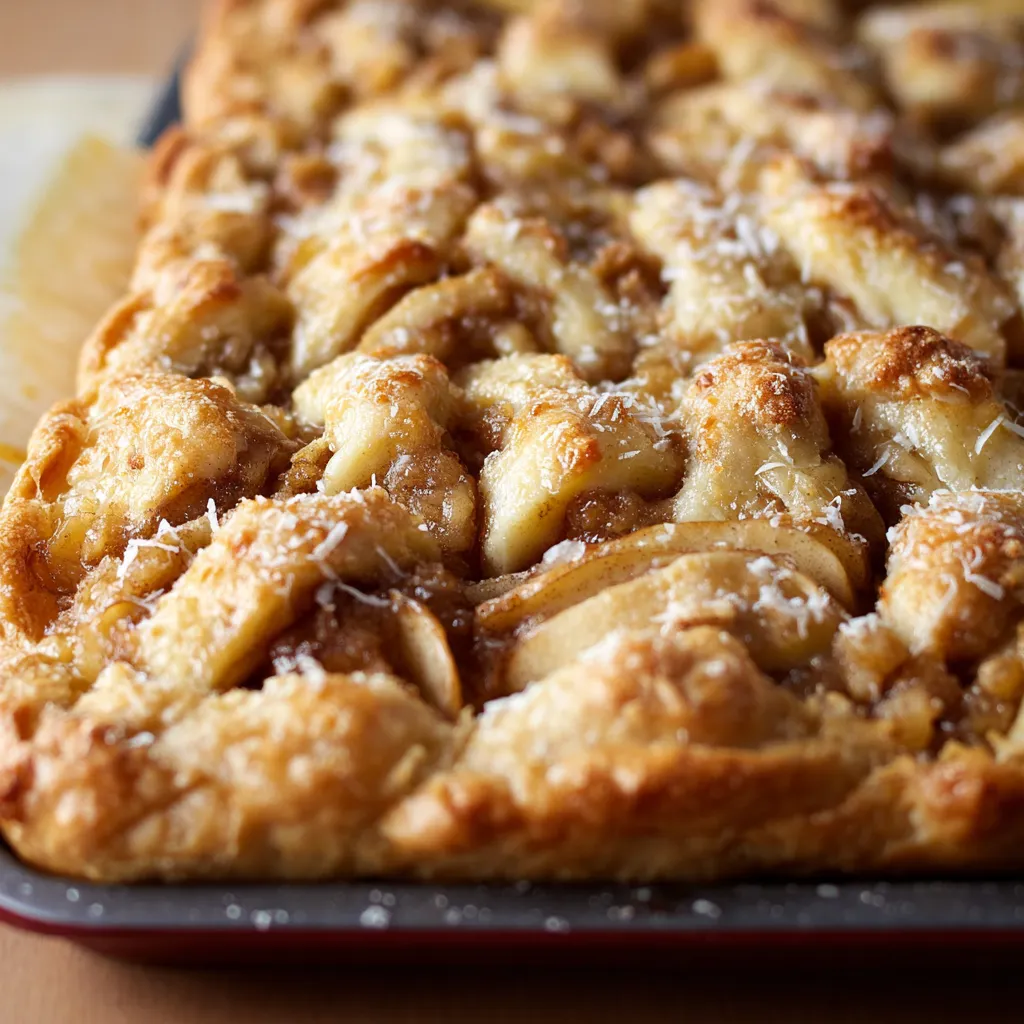
- The Crust: Flaky, buttery, and golden brown – the foundation of any great pie. We’ll use a simple yet effective technique to achieve pie crust perfection.
- The Filling: A symphony of sweet and tart apples, perfectly spiced with cinnamon, nutmeg, and a hint of lemon. The apples are cooked *just* enough to be tender but still hold their shape.
- The Size: This slab pie is designed to feed a crowd! It’s baked in a 9×13 inch pan, making it ideal for sharing.
- The Ease: While homemade pie might seem intimidating, this recipe is surprisingly straightforward. I’ll walk you through each step with clear instructions and helpful tips.
Ingredients You’ll Need
Before we get started, let’s gather our ingredients. Fresh, high-quality ingredients are key to a truly exceptional apple slab pie.
For the Crust:
- 2 ½ cups all-purpose flour, plus more for dusting
- 1 teaspoon salt
- 1 cup (2 sticks) unsalted butter, very cold and cut into cubes
- ½ cup ice water
For the Filling:
- 6-7 medium apples (such as Honeycrisp, Granny Smith, or a mix), peeled, cored, and sliced
- ¾ cup granulated sugar
- ¼ cup packed light brown sugar
- 3 tablespoons all-purpose flour
- 1 teaspoon ground cinnamon
- ¼ teaspoon ground nutmeg
- 1 tablespoon lemon juice
- 2 tablespoons unsalted butter, cut into small pieces
For the Egg Wash (Optional):
- 1 large egg, beaten
- 1 tablespoon milk or cream
For the Topping (Optional):
- Turbinado sugar (for sprinkling)
Step-by-Step Instructions
Alright, let’s get baking! Follow these steps carefully, and you’ll be enjoying a slice of warm, delicious apple slab pie in no time.
- Make the Crust: In a large bowl, whisk together the flour and salt.
- Cut in the Butter: Add the cold, cubed butter to the flour mixture. Using a pastry blender or your fingertips, cut the butter into the flour until the mixture resembles coarse crumbs. You should still see small pieces of butter. *This is crucial for a flaky crust!*
- Add the Ice Water: Gradually add the ice water, one tablespoon at a time, mixing lightly after each addition. Stop adding water when the dough just comes together. Don’t overmix!
- Form the Dough: Gently form the dough into a disc. Divide the disc in half, flatten each half into a 1-inch thick circle, wrap tightly in plastic wrap, and refrigerate for at least 30 minutes (or up to 2 days). *Chilling the dough allows the gluten to relax, resulting in a more tender crust.*
- Prepare the Apple Filling: In a large bowl, combine the sliced apples, granulated sugar, brown sugar, flour, cinnamon, nutmeg, and lemon juice. Toss gently to coat.
- Preheat the Oven: Preheat your oven to 375°F (190°C).
- Roll Out the Bottom Crust: On a lightly floured surface, roll out one disc of dough into a rectangle large enough to fit the bottom of a 9×13 inch baking pan. Carefully transfer the dough to the pan and gently press it into the bottom and up the sides. Trim any excess dough, leaving about a ½-inch overhang.
- Add the Filling: Pour the apple filling into the prepared crust. Dot the top of the filling with the small pieces of butter.
- Roll Out the Top Crust: Roll out the remaining disc of dough into a rectangle slightly larger than the pan. Carefully place it over the apple filling. Trim any excess dough, leaving a ½-inch overhang.
- Seal the Crust: Crimp the edges of the top and bottom crusts together to seal, creating a decorative edge. You can use a fork to press down around the edges for a simple seal.
- Vent the Crust: Cut several slits in the top crust to allow steam to escape during baking. This will prevent the crust from puffing up too much.
- Egg Wash (Optional): If desired, brush the top crust with the egg wash for a golden brown finish. Sprinkle with turbinado sugar for extra sparkle.
- Bake: Bake for 45-55 minutes, or until the crust is golden brown and the filling is bubbly. If the crust starts to brown too quickly, tent the pie with foil.
- Cool: Let the pie cool completely on a wire rack before slicing and serving. This allows the filling to set. *Patience is key!*
Success Tips for the Perfect Apple Slab Pie
Want to guarantee pie-making success? Here are my top tips for creating a truly unforgettable apple slab pie.
- Use Cold Ingredients: This is the *most* important tip for a flaky crust. Cold butter and ice water prevent the gluten from overdeveloping, resulting in a tender, flaky crust. Make sure your butter is very cold before cutting it into the flour.
- Don’t Overmix the Dough: Overmixing develops the gluten in the flour, which leads to a tough crust. Mix the dough *just* until it comes together. It’s okay if it’s a little shaggy.
- Chill the Dough: Chilling the dough allows the gluten to relax and the butter to firm up, which makes the dough easier to roll out and prevents it from shrinking during baking.
- Use a Mix of Apples: Combining different types of apples creates a more complex and flavorful filling. I like to use a mix of Honeycrisp (for sweetness) and Granny Smith (for tartness).
- Don’t Skip the Lemon Juice: Lemon juice brightens the flavors of the apple filling and prevents the apples from browning.
Variations and Adaptations
Want to put your own spin on this classic apple slab pie? Here are a few ideas to get you started.
- Add a Crumble Topping: For a delicious twist, top the pie with a buttery crumble topping made from flour, oats, sugar, and butter.
- Use Different Spices: Experiment with different spices, such as cardamom, ginger, or allspice, to create a unique flavor profile.
- Add Nuts: Chopped pecans or walnuts add a delightful crunch to the filling or crumble topping.
- Caramel Apple Slab Pie: Drizzle caramel sauce over the baked pie for an extra decadent treat. Think of it like a giant version of Caramel Apple Bars, but in pie form!
- Apple Cranberry Slab Pie For a holiday twist, add cranberries to the apple filling. The tartness of the cranberries complements the sweetness of the apples beautifully.
Serving Suggestions
This apple slab pie is delicious on its own, but here are a few serving suggestions to elevate your experience.
- Warm with Vanilla Ice Cream: A classic pairing that never fails to delight. The warm pie and cold ice cream create a delightful contrast of temperatures and textures.
- With a dollop of Whipped Cream: Homemade whipped cream adds a touch of elegance and richness to the pie.
- Drizzled with Caramel Sauce: An extra touch of sweetness and indulgence.
- Alongside a cup of hot coffee or tea: The perfect accompaniment for a cozy afternoon treat.
Making Ahead and Storage Instructions
Want to get ahead of the game? Here’s how to make this apple slab pie in advance.
- Make the Crust Ahead: The pie crust can be made up to 2 days in advance and stored in the refrigerator, tightly wrapped in plastic wrap. You can also freeze the crust for up to 2 months. Thaw it in the refrigerator overnight before using.
- Assemble the Pie Ahead: You can assemble the entire pie (unbaked) up to 24 hours in advance and store it in the refrigerator. Add a few extra minutes to the baking time if baking from cold.
- Storage: Baked apple slab pie can be stored at room temperature for up to 2 days or in the refrigerator for up to 4 days. Cover the pie loosely to prevent it from drying out.
- Freezing: Baked apple slab pie can be frozen for up to 2 months. Wrap the pie tightly in plastic wrap and then in foil. Thaw it in the refrigerator overnight before serving.
Pairing Ideas for Your Apple Slab Pie
Elevate your dessert experience by pairing your warm apple slab pie with complementary flavors. Here are a few ideas to consider:
- Wine Pairing: A slightly sweet dessert wine like Moscato d’Asti or a crisp Riesling can enhance the apple flavors. For a richer pairing, try a Tawny Port.
- Cheese Pairing: A sharp cheddar cheese can create a delightful sweet-and-savory contrast with the apple pie. A creamy brie or a tangy goat cheese are also excellent options.
- Drink Pairing: Besides coffee or tea, consider pairing your pie with a warm glass of apple cider or spiced rum for a cozy and festive treat.
- How about making some Apple Crisp Mini Cheesecakes or even these Baked Apple Cider Donuts for the ultimate apple themed feast.
- If you enjoy your fruit in bread form, this Cinnamon Apple Bread is another winner, which you can enjoy with the pie.
Troubleshooting Your Apple Slab Pie
Even with the best recipe, baking can sometimes throw us curveballs. Here are some common issues and how to fix them:
- Crust is Too Tough: This is usually caused by overmixing the dough. Remember to mix only until the dough just comes together. Also, ensure your butter is very cold.
- Crust is Soggy: Make sure the oven is hot enough and bake the pie on the bottom rack to ensure the crust cooks through. Blind baking the crust for a few minutes before adding the filling can also help.
- Filling is Too Runny: This can happen if the apples release too much juice. Adding a bit more flour or cornstarch to the filling can help thicken it.
- Crust is Burning: If the crust is browning too quickly, tent the pie with foil during the last 15-20 minutes of baking.
- Pie is Bubbling Over: Place a baking sheet lined with foil under the pie to catch any drips and prevent a mess in your oven.
Why Home Baking Matters
In a world of convenience and instant gratification, there’s something truly special about home baking. The aroma of apples and cinnamon filling your kitchen, the satisfaction of creating something from scratch, and the joy of sharing it with loved ones – these are the moments that make life richer and more meaningful.
Plus, when you bake at home, you have complete control over the ingredients. You can choose high-quality, wholesome ingredients and avoid the preservatives and additives found in many store-bought desserts. You can also adjust the sweetness and spice levels to suit your own preferences.
Don’t forget to check out my recipe for Caramel Apple Cheesecake Dip for another amazing apple dessert idea!
Or you might enjoy these Apple Pie Cookies
Conclusion
There you have it – my ultimate guide to making a Home-baked Apple Slab Pie that will impress your friends and family. It might seem like a lot of steps, but trust me, it’s easier than you think, and the results are well worth the effort. So, gather your ingredients, put on some music, and get ready to bake a little magic. You’ve got this! Happy baking, friends!
What makes this apple slab pie recipe different from other apple pie recipes?
This recipe has been perfected over years and focuses on a flaky, buttery crust, a balanced sweet and tart apple filling with cinnamon, nutmeg, and lemon, its large 9×13 inch size ideal for sharing, and straightforward instructions for ease of baking.
What are the key tips for achieving a flaky pie crust?
The most important tips for a flaky crust are using cold ingredients (especially cold butter and ice water), not overmixing the dough, and chilling the dough before rolling it out.
Can the apple slab pie be made in advance?
Yes, the pie crust can be made up to 2 days in advance and stored in the refrigerator or frozen for up to 2 months. The entire unbaked pie can be assembled 24 hours in advance and stored in the refrigerator. Baked pie can be stored at room temperature for up to 2 days or in the refrigerator for up to 4 days, and even frozen for up to 2 months.
What can I do if my apple slab pie filling is too runny after baking?
If the filling is too runny, it means the apples released too much juice. You can add a bit more flour or cornstarch to the filling next time to help thicken it.
Best Ever Apple Slab Pie
Equipment
- Large bowl
- Whisk
- Pastry blender or fingertips
- Measuring cups and spoons
- Plastic Wrap
- 9×13 inch baking pan
- Rolling Pin
- Lightly floured surface
- pizza cutter or knife
- Fork
- Baking sheet (optional)
- Wire rack
- Oven
Ingredients
- 2 ½ cups all-purpose flour, plus more for dusting
- 1 teaspoon salt
- ½ cup ice water
- 6-7 medium apples such as Honeycrisp, Granny Smith, or a mix
- ¾ cup granulated sugar
- ¼ cup packed light brown sugar
- 3 tablespoons all-purpose flour
- 1 teaspoon ground cinnamon
- ¼ teaspoon ground nutmeg
- 1 tablespoon lemon juice
- 2 tablespoons unsalted butter, cut into small pieces
- 1 large egg, beaten
- 1 tablespoon milk or cream
- Turbinado sugar for sprinkling
Instructions
- Make the Crust: In a large bowl, whisk together the flour and salt.
- Cut in the Butter: Add the cold, cubed butter to the flour mixture. Using a pastry blender or your fingertips, cut the butter into the flour until the mixture resembles coarse crumbs. You should still see small pieces of butter.
- Add the Ice Water: Gradually add the ice water, one tablespoon at a time, mixing lightly after each addition. Stop adding water when the dough just comes together. Don’t overmix!
- Form the Dough: Gently form the dough into a disc. Divide the disc in half, flatten each half into a 1-inch thick circle, wrap tightly in plastic wrap, and refrigerate for at least 30 minutes (or up to 2 days).
- Prepare the Apple Filling: In a large bowl, combine the sliced apples, granulated sugar, brown sugar, flour, cinnamon, nutmeg, and lemon juice. Toss gently to coat.
- Preheat the Oven: Preheat your oven to 375°F (190°C).
- Roll Out the Bottom Crust: On a lightly floured surface, roll out one disc of dough into a rectangle large enough to fit the bottom of a 9×13 inch baking pan. Carefully transfer the dough to the pan and gently press it into the bottom and up the sides. Trim any excess dough, leaving about a ½-inch overhang.
- Add the Filling: Pour the apple filling into the prepared crust. Dot the top of the filling with the small pieces of butter.
- Roll Out the Top Crust: Roll out the remaining disc of dough into a rectangle slightly larger than the pan. Carefully place it over the apple filling. Trim any excess dough, leaving a ½-inch overhang.
- Seal the Crust: Crimp the edges of the top and bottom crusts together to seal, creating a decorative edge. You can use a fork to press down around the edges for a simple seal.
- Vent the Crust: Cut several slits in the top crust to allow steam to escape during baking. This will prevent the crust from puffing up too much.
- Egg Wash (Optional): If desired, brush the top crust with the egg wash for a golden brown finish. Sprinkle with turbinado sugar for extra sparkle.
- Bake: Bake for 45-55 minutes, or until the crust is golden brown and the filling is bubbly. If the crust starts to brown too quickly, tent the pie with foil.
- Cool: Let the pie cool completely on a wire rack before slicing and serving. This allows the filling to set.
